December 31, 2009

... Sweet and Spicy Almonds

This recipe is so easy to whip up - perfect for a holiday gift, to take to a NYE party, or, I'm thinking, even a Super Bowl party, Game Night, whatever.  Who doesn't love a bowl of nuts for snacking??


Most likely, you'll have most of the ingredients in your kitchen and since it takes less than 20 minutes from start to finish, I think you'll love recipes from Everyday Food just like I do.


2 1/2 cups unblanched almonds
1/4 cup sugar
1 1/2 teaspoons coarse salt
1 teaspoon cayenne pepper
1 tablespoon honey
1 tablespoon water
1 teaspoon olive oil

Preheat oven to 350 degrees.  Spread almonds on a rimmed baking sheet; toast until fragrant, about 10 minutes.  In a large bowl, combine sugar, salt and cayenne pepper.

In a large skillet, over medium heat, cook honey and water with olive oil, stirring, until combined, 1 minute.  Add almonds; toss to coat.

Transfer nuts to sugar mixture (do not scrape extra glaze into bowl); toss to coat.  Cool in a single layer.

Taylor's Notes:
I just use a full 1 lb bag of almonds.  It's about 3 cups so I just adjust the other ingredients accordingly - like a heaping 1/4 cup of sugar instead of a level one.  Definitely be sure to not scrape the extra glaze from the skillet into the sugar mixture.  It makes a mess and the almonds don't come out looking like they do above (trust me).  They do taste as good, but they're not as pretty.  And who doesn't want pretty almonds??  

Enjoy!

December 23, 2009

... Chocolate Hazelnut Baklava

You know, sometimes you come across a recipe that makes you say "Ohhhh yeahhhhh."  Well, here was mine for the year.  Thanks to Cooking Light for presenting me with my recipe of 2009... too bad I didn't come across it until November.  Or maybe not so bad (where my hips are concerned!)  Regardless, I think I'll be making this one for years to come.  Especially around the holidays.  Toasted nuts, hazelnut-chocolate spread, pastry... it just screams "holiday", doesn't it?


The recipe is actually pretty simple if you're patient enough to take the time (about an hour to assemble) and to clean up the mess (totally worth it).  And, unless you can find hazelnuts out of the shell, it's a great stress reliever to bang the heck out of those shells.  My tool of choice: a meat tenderizer.


Above is a shot of the baklava right out of the oven after I poured the honey / cinnamon  mixture on top.  So golden and shiny!  Below is a shot of them plated.  Look at that nutty, hazelnut-chocolaty goodness!!


Chocolate Baklava (apparently I added "Hazelnut" to the title on my own)
serves 24

3/4 cup honey
1/2 cup water
1 (3 inch) cinnamon stick
1 cup hazelnut-chocolate spread (such as Nutella) (equates to one jar)
1/2 cup toasted hazelnuts, coarsely chopped
1/2 cup roasted pistachios, coarsely chopped
1/3 cup blanched toasted almonds, coarsely chopped
1/3 cup toasted walnuts, coarsely chopped
1/2 teaspooon ground cinnamon
1/8 teaspoon salt
24 (14x9 inch) sheets frozen phyllo dough, thawed
1/2 cup butter, melted

Combine first 3 ingredients in a medium saucepan over low heat; stir until honey dissolves.  Increase heat to medium; cook, without stirring, until a candy thermometer registers 230 degrees (about 10 minutes).  Remove from heat; keep warm.  Discard cinnamon stick.

Preheat oven to 350 degrees.

Place hazelnut-chocolate spread in a microwave safe bowl; microwave on high for 30 seconds or until melted.  Combine hazelnuts and next 5 ingredients (through salt).  Lightly coat a 13x9 inch baking dish with cooking spray.  Working with 1 phyllo sheet at a time (cover remaining dough to prevent drying), place 1 phyllo sheet lengthwise in bottom of prepared pan, allowing ends of sheet to extend over edges of dish; lightly brush with butter.  Repeat procedure with 5 phyllo sheets and butter.  Drizzle about 1/3 cup melted hazelnut-chocolate spread over phyllo.  Sprinkle evenly with one-third of nut mixture (about 1/2 cup).  Repeat procedure twice with phyllo, butter, hazelnut-chocolate spread, and nut mixture.  Top last layer of nut mixture with remaining 6 sheets phyllo, each lightly brushed with butter.  Press gently into pan.

Make 3 lengthwise cuts and 5 crosswise cuts to form 24 portions using a sharp knife.  Bake at 350 degrees for 35 minutes or until phyllo is golden.  Remove from oven.  Drizzle honey mixture over baklava.  Cool in pan on a wire rack.  Cover; store at room temperature.

Taylor's Notes:
First off, don't make the honey / water / cinnamon mixture until the baklava is about halfway done baking.  How on earth are you supposed to make that, remove it from the heat and keep it warm while you're assembling the baklava and letting it bake for 35 minutes?!?  Secondly, definitely use butter.  I used margarine both times I made this and it just turns into a watery consistency when it's melted.  It still tastes good - no doubt about that! - but I think I'll use butter next time.  Also,  unless you want to be wasteful like I was, find another use for the remaining phyllo dough.  There's probably 20 sheets left out of the box after you finish this recipe.


In case you can't find the four types of nuts already toasted / roasted, you can spread them out on a cookie sheet and bake them at 350 degrees for 10-12 minutes.  Bonus: your oven will smell so warm and cozy when you take them out!  I think the recipe is a little confusing, so to clarify, basically you're preparing 4 layers of phyllo and 3 layers of goodness.  6 sheets of buttered phyllo, spread Nutella, sprinkle nuts, 6 sheets of buttered phyllo, spread Nutella, sprinkle nuts, 6 sheets of buttered phyllo, spread Nutella, sprinkle nuts, 6 sheets of buttered phyllo and pop it in the oven.  And one last tip, don't drink a bottle of wine at dinner with your sister prior to making this... otherwise you'll lose count of the layers of phyllo and confuse yourself :)


Enjoy!  

November 16, 2009

... Baked Ziti (or Penne, as the case may be)

If you're in the Kansas City area, which I'm pretty sure the majority of my whopping nine readers are (love you all!) you know how cold it was today.  Snow?  Seriously?  I guess it's about time, but I think I'd rather it be December before we start getting the white stuff.  Regardless, the cold called for something warm for dinner.  And what better reason than to pull out my new Real Simple cookbook Best Recipes: Easy, Delicious Meals... (I was a lucky one who received it for free in the giveaway, but it's a great Christmas gift idea if you ask me!)


The recipe was really easy and pretty darn inexpensive, too.  And, as you'll see below, it'll feed an army.


Pair the Baked Ziti with a nice red wine and some crusty, roasted garlic bread and you've got the makings for a warm, cozy meal on a cold, snowy night.


serves 4 (yeah right!)

12 ounces ziti (about 4 cups) (or penne if you can't find ziti)
1 tablespoon olive oil
1 large onion, chopped
2 cloves garlic, finely chopped
1/2 pound lean ground beef
kosher salt and black pepper
1 26-ounce jar marinara sauce
1 bunch spinach, thick stems removed (about 4 cups)
1/2 cup ricotta
1/2 cup grated Parmesan (2 ounces)
1 cup grated mozzarella (4 ounces)

Heat oven to 400 degrees.  Cook the pasta according to the package directions.  Drain the pasta and return it to the pot.

Meanwhile, heat the oil in a large skillet over medium heat.  Add the onion and garlic and cook, stirring occasionally, until they begin to soften, 4 to 5 minutes.  Add the meat, 3/4 teaspoon salt, and 1/4 teaspoon pepper and cook, breaking up the meat with a spoon until it's no longer pink, 5 to 6 minutes.

Toss the pasta with the meat mixture, marinara sauce, spinach, ricotta, and 1/4 cup of the Parmesan.  Transfer to a 9x13 baking dish or 4 large ramekins.  Sprinkle with the mozzarella and the remaining 1/4 cup of Parmesan and bake until the cheese melts, 12 to 15 minutes.

Taylor's Notes:
I used ground turkey instead of ground beef and ended up using about 3/4 pounds.  I also used reduced fat ricotta and mozzarella cheeses.  The recipe says that this serves four, but in reality it's more like 6 or 8 servings... at least.  As Rich said, "that might be four servings if you're feeding an offensive line."  Since we aren't, we'll be having delicious leftovers to keep us warm all week long.   

Enjoy!


October 31, 2009

... the best cure for the common cold

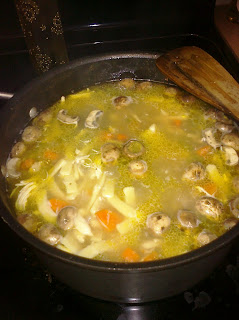
So I've had this stupid cold for nearly two weeks now.  The doctor, of course, couldn't do anything for me since it's just a virus so I decided to take the matter into my own hands.  With the help of Dad's Chicken Noodle Soup (and a few otc's) I'm on the road to recovery!


I'm a little torn on whether to give this family recipe or not, but why not share the love, right?  And this is even more special... in the way only my Dad can do, here's his recipe for...

Dad's Chicken Noodle Soup

Put two quarts of water in a four-quart soup pot and bring to a brisk boil.  While the water is heating up, add one whole white onion, chopped course, six celery stalks chopped to your liking, two bay leaves, and salt and course ground pepper to taste.  (I usually use about a teaspoon of salt and a half-teaspoon of pepper.)  Extras you could add at this point include a carrot, sliced thinly, or chopped coarsely, for a little extra color and flavor.  Same way with adding a half-cup or so of frozen peas.

While the water is coming to a boil, take a whole chicken and rinse well.  Be sure to take the giblets out of the body cavity.  Sometimes they're in a paper bag, sometimes they're just in there.  I usually just rinse them well and toss them in the pot and cook them along with the chicken for flavor.  This is your option.

When the water is boiling briskly, put the whole chicken in the pot.  Partially cover, and cook for about thirty minutes, or until the chicken is very tender.  (Check it with a kitchen fork.)  Remove the whole chicken and the giblets from the pot, and reduce the heat to a very slow boil.  Let the chicken cool to a point that you can handle it without burning your little fing-fings.  Then de-bone the chicken.  You can either 'jerk' the chicken (tear it into strips and pieces), or you can use a knife to cut it into pieces the size you want.  Put the chicken (and chopped giblets, if you want) back in the pot.  You can adjust the amount of soup you want at this point by adding extra water.  Bring back to a very slow boil.  Extras you can add at this point are some mushrooms, whole or sliced, depending on their size, just to add some tasty little morsels.

Add noodles.  You can use any kind of noodle or pasta you want to.  I like the medium wavy noodles by American Beauty, or the homemade egg noodles that you can find in the freezer section.  After adding the noodles, cook the soup for at least another thirty minutes, but not more than an hour.  If you cook the soup too long, the noodles will get mushy and fall apart.  So, best to cook until the noodles are done, then remove from heat and serve.  Or, like chili, this soup gets better after refrigerating overnight, and reheating the next day.

Taylor's Notes:
Thank goodness Tyson prepares their chickens now so that you can buy them without the neck and giblets!  I've had to pull the neck and giblets out of a chicken once and let me just say that I hope to never do it again.  Other than that, I pretty much follow this recipe exactly... except the peas, I leave out the peas.  I use Reames egg noodles from the freezer section because they just give it that more "homemade" feel.  And you know what... my cold is gone.  


Enjoy!

September 15, 2009

... a trip to Tybee Island & Savannah, Georgia


We took an "end of summer" vacation this past weekend to Tybee Island and Savannah, Georgia.  If you haven't been, I'd definitely recommend it.  Tybee Island is a quaint little beach town with perfect beach vacation activities: bike riding, lounging on the beach, eating great seafood.  


On Tybee, we ate at The Crab Shack and had raw oysters on the half shell and the Shack Specialty - a sortof low boil of crab legs, mussels, corn on the cob, sausage, shrimp, potatoes, crawdads... it was so fresh and delicious!  We also stopped at The Sugar Shack for breakfast a couple mornings and enjoyed egg & bacon sandwiches and grits... so southern!  I'm still kicking myself for not indulging in a chocolate malt... places like that always have the best ice cream concoctions.  We had lunch at AJ's Dockside.  With great outdoor seating, refreshing Rum Punch and seafood po'boys you should definitely check it out.  Another place you have to go to if you're ever on Tybee is Huc-a-Poos.   Owned by good friends of a good friend, Huc-a-Poos is the best little bar on the island.  Delicious pizza, cold beer and great people - what more could you want?  


We took a little road trip to Savannah one evening to experience The Lady & Sons, Paula Deen's restaurant.  I have never been so full of down home cooking in my entire life and I'd do it again in a heartbeat... even if that heartbeat is now dripping in butter :)  Definitely try out the buffet when you're there for a sampling of everything that's good about southern cooking - fried chicken, low boil, mashed potatoes, lima beans, mac n' cheese, black eyed peas, sweet candied yams... my mouth is watering!  


Now... where's that treadmill?

September 7, 2009

... Pomegranate Chipotle Dip


Have you heard of Tastefully Simple? Because if you haven't, you have now and you should check it out. Buy it. It's good. Really. Go now (well, as soon as you're finished reading).

Everything I've ever made with Tastefully Simple goods has been great, but this may be one of the best purchases ever. I try to always have a jar of Pomegranate Chipotle Sauce in my pantry. (Ash, I'll be ordering soon!) There are so many things you can use it for. Honestly, I've only ever used it for this dip, but I'm sure there are many other uses and you can even look up recipes for it on the website. Have you gone yet? Do it.

This dip is the easiest thing to make. It requires 4 ingredients (5 if you count the crackers) and it might take an entire 10 minutes to put together... if that. I'm pretty sure you won't even need to write it down. Ready?

1 block of cream cheese (I typically use the 1/3 less fat from Kraft)
Pomegranate Chipotle Sauce
bacon (most of the time I use turkey bacon... don't tell Rich!)
green onions, chopped

Place the block of cream cheese on a plate. Pour Pomegranate Chipotle Sauce over it - however much you want. I usually just eyeball it. Sprinkle crumbled bacon (cooked of course!) and green onions on top. Serve it with crackers - I use Wheat Thins (reduced fat... again, shhh)


Really. Make it. People will love you. Seriously. Like really love you. And they'll ask you to make it again... and again... and again...

Enjoy!

September 6, 2009

... Grilled Salmon with Gazpacho Salsa


So here it is, the inaugural blog post. I suppose this is like with anything else, you just jump in and see what happens... right? One thing was for sure, the first post had to be a good one. You be the judge.

The recipe for Grilled Salmon with Gazpacho Salsa came from my Nordstrom Friends & Family cookbook. I've had it for a couple years now and I'm ashamed to say that this may be the first recipe I've made from it. There's a first time for everything, though, and it definitely won't be the last. The recipe was really easy and didn't call for crazy or expensive ingredients... yea!

As we do with most (ok, all) new (or old) recipes we make, Rich and I started by opening a bottle of red. This one was really great... straight from Sonoma Valley. Thanks Kate & Jimmy! The only thing that disappointed me about it was knowing you can only get the black label Cellar 8 at their winery in Sonoma. Looks like I may need to book a little vacay soon!

Ok, the recipe... chopping up the veggies was the most time consuming part. And really, that didn't even take too long. Once I finished the salsa, I popped it in the frige and Rich got started on the salmon. Prepping the salmon was super easy (especially since Rich did it) and all it called for was olive oil, salt and pepper. To the grill for 4-5 minutes per side and voila! dinner is ready.


We served it up with a big garden salad and some warm, crusty whole grain bread. I know the picture quality isn't exactly the same, but I'd say we did a pretty good job, don't you think?


serves 6

8 plum tomatoes, cored, seeded, diced and drained
1 small cucumber, peeled, seeded and diced
3 green onions, including green tops, finely chopped
1/2 cup diced red onion
1 yellow bell pepper, seeded, deribbed and diced
3 tablespoons red wine vinegar
1/2 cup extra virgin olive oil
1/4 cup fresh lemon juice
1/2 cup ketchup
1 teaspoon Worcestershire sauce
1/2 teaspoon Tabasco sauce
kosher salt
freshly ground black pepper

2 1/2 pounds salmon fillet, skinned and cut into 6 equal portions, each about 4 inches square
2 tablespoons olive oil
kosher salt
freshly ground black pepper
vegetable oil for brushing

To make the Gazpacho Salsa, in a large bowl, combine the tomatoes, cucumber, green onions, red onion, bell pepper, vinegar, olive oil, lemon juice, ketchup, Worcestershire sauce, and Tabasco sauce. Season to taste with salt and pepper. Mix thoroughly, cover, and refrigerate until ready to serve.

Prepare a medium fire in a charcoal grill or preheat a gas grill on medium.

Rub the salmon pieces with a light amount of olive oil and season well with salt and pepper. Brush the grill grate generously with vegetable oil. Place the salmon directly over the fire. Cover the grill and cook on one side until a spatula inserted under the salmon easily lifts the fillet, about 4 minutes. Turn the salmon about 90 degrees to create attractive cross-hatching and cook for 1 minute longer. Carefully flip the salmon over and continue grilling, covered, until opaque throughout and the fish flakes easily when tested with a fork, about 4 minutes.

Using a wide spatula, transfer the salmon to warmed dinner plates. Spoon about 1/2 cup of the Gazpacho Salsa over each portion of grilled salmon and serve immediately.

Taylor's notes:
We cut this recipe in half and used 1 1/2 pounds of salmon which was more than plenty for the two of us. Rich bought the salmon skin-on, so prepared the skinless side with olive oil, salt and pepper. He grilled the salmon skin-side down for 4 minutes, flipped the salmon and peeled off the skin. He then oiled, salted and peppered that side and continued with the grilling. He flipped the salmon back over and grilled that side for another minute. Even after halving the salsa recipe, we had a lot leftover. I think it'll be tasty on top of grilled chicken or pork in the next day or two.

Enjoy!