Showing posts with label blue cheese. Show all posts

May 13, 2012

... Peach and Gorgonzola Chicken Pizza

You always want what you can't have.  I've been waiting a while for peaches to be in season so that I could make this pizza.  It's not a normal combo: peaches, chicken, and stinky cheese, but it sure is a good one.


It'll be difficult to not eat it all in one sitting, but if you save some for leftovers you'll be very glad you did.  The good news is that if you do indulge, you can feel a little less guilty as this is another terrific recipe from Cooking Light.


serves 4

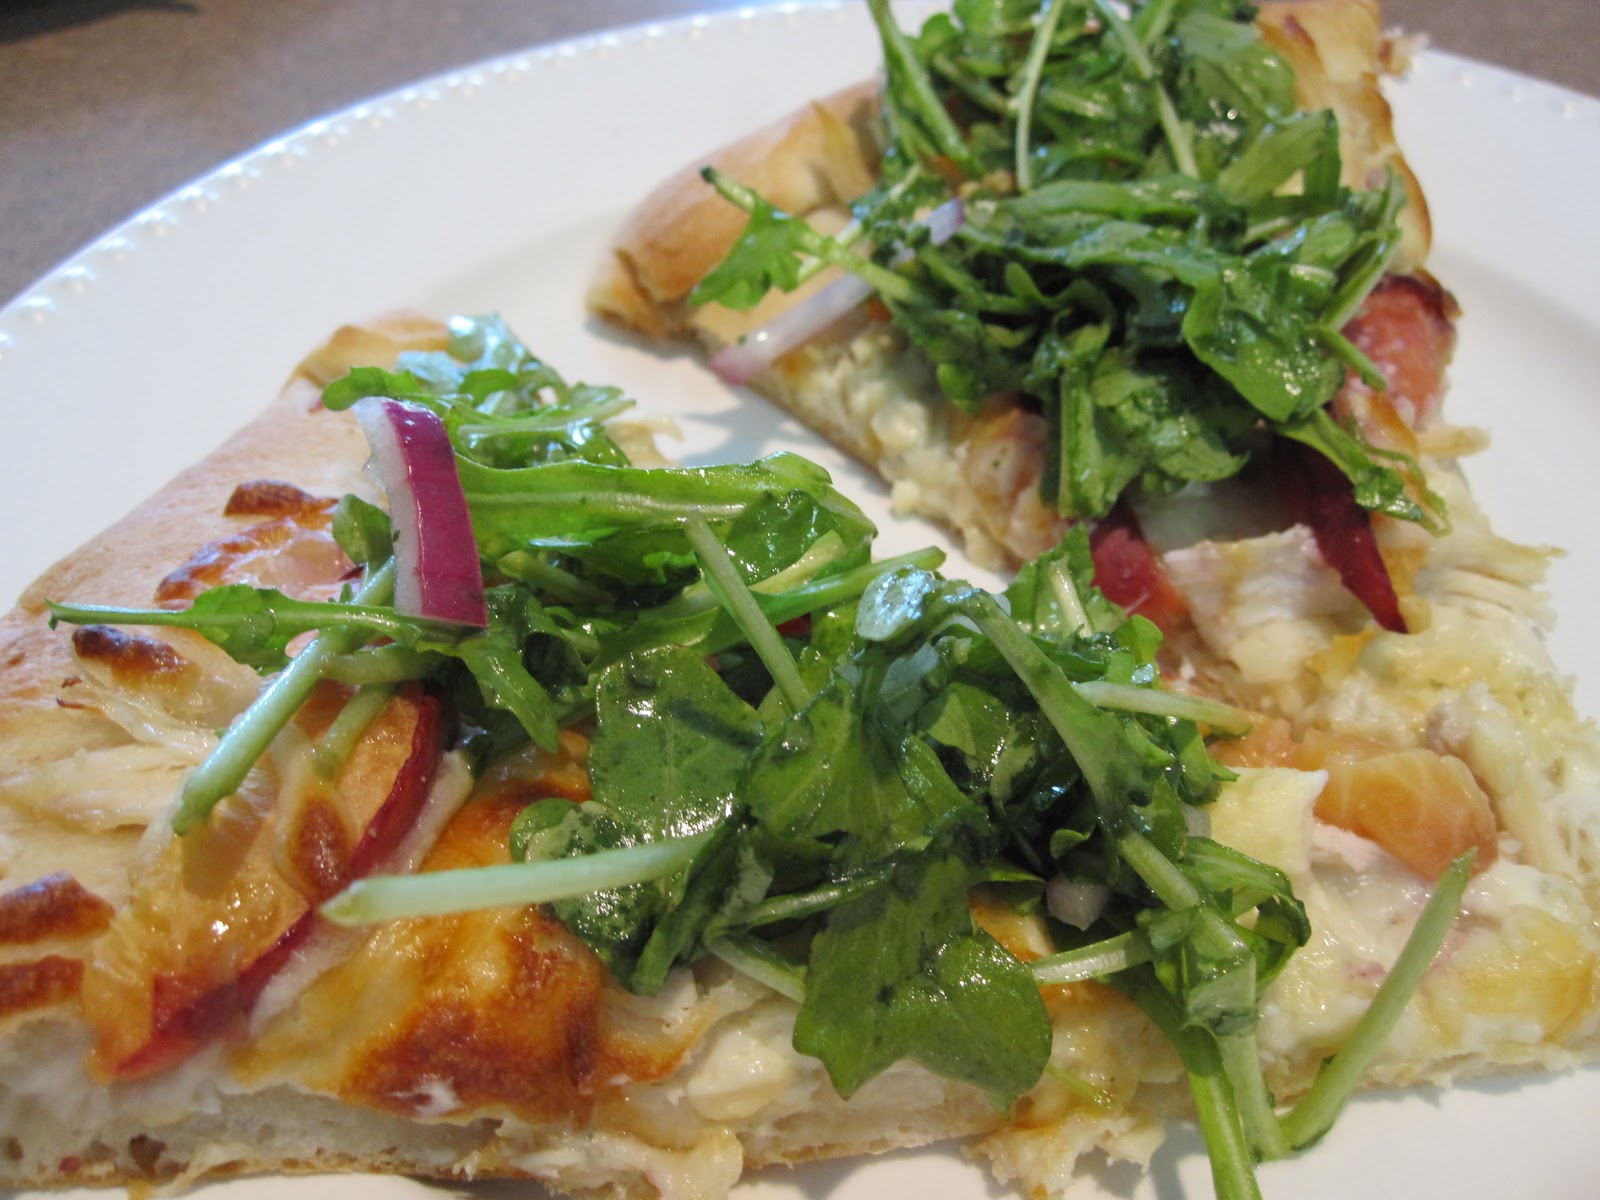
1 (10-ounce) prebaked thin pizza crust (such as Boboli)
cooking spray
1 teaspoon extra-virgin olive oil
1/2 cup (2 ounces) shredded part-skim mozzarella cheese, divided
1 cup shredded cooked chicken breast
1/3 cup (about 1 1/2 ounces) crumbled Gorgonzola cheese
1 medium unpeeled peach, thinly sliced
1/3 cup balsamic vinegar

Preheat oven to 400 degrees.

Place pizza crust on baking sheet coated with cooking spray.  Brush 1 teaspoon extra-virgin olive oil evenly over crust.  Top evenly with 1/4 cup shredded mozzarella cheese, chicken, Gorgonzola cheese, and peach slices.  Top with remaining 1/4 cup mozzarella.  Bake at 400 degrees for 11 minutes or until crust browns.  

Place vinegar in a small saucepan over medium-high heat; cook until reduced to 2 tablespoons (about 5 minutes).  Drizzle balsamic reduction evenly over pizza.  Cut pizza into 8 wedges.

Arugula Salad
serves 4

Combine 1 teaspoon minced shallots, 2 teaspoons lemon juice, and 1/2 teaspoon honey in a large bowl; gradually whisk in 1 tablespoon extra-virgin olive oil.  Add 4 cups loosely packed arugula and 1/3 cup vertically sliced red onion to bowl; toss gently to coat.

Taylor's Notes:
I used a canned pizza dough instead of a prebaked dough.  You could also use your own homemade dough if you do that or purchase premade dough from your favorite pizza shop.  Just adjust the baking time accordingly.  I ended up baking my pizza for about 20 minutes.  

I actually completely forgot about the balsamic reduction until I just typed it out in the recipe.  Dang!  Good thing I have leftovers and can whip that up later today... see, it all works out in the end.

Enjoy!

March 31, 2011

... Pears with Blue Cheese and Prosciutto

Remember when I wrote about this and I told you that you'd be seeing several upcoming posts as a direct result of it?  Well, here we go!

- ripe, organic pears -

- fresh, crisp arugula - 

It just so happened that I had Wine Club this week and needed a great little appetizer to take.  I stumbled across this recipe and knew it'd be a hit.  When I received pears and arugula in my bitty box delivery, I knew it was the one.  It's kismet, no?


The crisp arugula gets laid over a juicy pear wedge, topped with creamy blue cheese and wrapped with a salty slice of prosciutto.  


It makes quite a bit... but doesn't last for long!


Pears with Blue Cheese and Prosciutto
serves 8

2 pears (such as Bosc or Bartlett), each cut into 8 wedges
2 teaspoons fresh lemon juice
1 cup arugula
3 ounces blue cheese, cut into small pieces
6 ounces thinly sliced prosciutto, cut in half lenthwise

In a large bowl, toss the pears and lemon juice.

Layer a slice of pear, an arugula leaf, and a piece of cheese on a piece of proscuitto and roll up.

Taylor's Notes:


That's about it... it's as simple as it sounds.  Quick to make, quick to disappear.


Enjoy!

March 13, 2011

... Spinach Calzones with Blue Cheese

I haven't met a calzone that I didn't like... especially one that I've made.  And why would I?  They're so easy to personalize and add whatever you'd like that they're sure to be a hit with you whoever you share them with.


Spinach and mushrooms is no big shocker for me, but adding blue cheese in a calzone was a first (which actually is a shocker if you know how much I love blue cheese.)  There's a first time for everything.


These little pockets get baked to perfection in a hot oven so the pizza dough gets a great crunch on the outside but stays soft and chewy with each bite.  The ingredients are yours to choose, but I highly recommend spinach, mushrooms and, from now on, blue cheese.


Spinach Calzones with Blue Cheese
serves 4

1 (10 ounce) can refrigerated pizza crust
cooking spray
4 garlic cloves, minced
4 cups spinach leaves
8 slices Vidalia or other sweet onion
1 1/3 cups sliced cremini or button mushrooms
3/4 cup (3 ounces) crumbled blue cheese

Preheat oven to 425 degrees.

Unroll dough onto a baking sheet coated with cooking spray; cut into four quarters.  Pat each quarter into a 6x5-inch rectangle.  Sprinkle garlic evenly over rectangles.  Top each rectangle with 1 cup spinach, 2 onion slices, 1/3 cup mushrooms, and 3 tablespoons cheese.  Bring 2 opposite corners to center, pinching points to seal.  Bring remaining 2 corners to center; pinching all points together to seal.  Bake at 425 degrees for 12 minutes or until golden.

Taylor's Notes:


There are so many great fresh ingredients in these calzones that it's nearly impossible to keep those corners pinched together.  Do whatever it takes, though, because this presentation is much more interesting than the typical all-you-see-is-crust package.  


I drizzled olive oil and sprinkled just a little kosher salt over the top of each calzone before I popped them in the oven.  It's just that extra bit of flavor that's totally worth the 10 seconds of effort.


Enjoy!

January 3, 2011

... Orecchiette with Chicken, Caramelized Onions, and Blue Cheese

Funny story... I love pasta.  Love it.  But I don't love tomato sauce.  I know, it's weird, but it's something about the texture of the stewed tomatoes that gets to me.  Anyhoo... I'm always up for a great pasta recipe with a unique list of ingredients that doesn't include anything mushy.


Another thing I'm a big fan of is fresh herbs.  And really, who isn't?  In a few shorts months, I'll be growing some on my own, but for now I'll pay the well-worth-it price for store-bought.


The caramelized onions were a sweet addition to the woodsy Rosemary and the earthy, nutty blue cheese.


There's nothing fancy about this grilled chicken, but it always makes you feel better eating pasta and cheese when there's something remotely healthy to accompany it.


Oreccheitte with Chicken, Caramelized Onions, and Blue Cheese
serves 4-6

2 tablespoons unsalted butter
5 tablespoons extra-virgin olive oil
4 yellow onions, quartered and thinly sliced
1 1/2 pounds boneless, skinless chicken breasts
1 tablespoon kosher salt, plus salt to taste
freshly ground black pepper
1 pound orecchiette pasta
1 tablespoon chopped fresh rosemary
1 1/2 cups (6 ounces) crumbled blue cheese

In a large skillet over medium-high heat, melt the butter and 4 tablespoons of the olive oil.  Add the onions, reduce the heat to medium, and cook, stirring frequently, until the onions are soft, richly browned, and caramelized, 20 to 25 minutes.  Remove from the heat and keep warm.

While the onions are cooking, prepare a hot fire in a charcoal grill or preheat a gas grill on high.  Pound the chicken lightly between 2 pieces of plastic wrap to a uniform 1/4-inch thickness.  Rub the chicken with the remaining 1 tablespoon olive oil and season well with salt and pepper.

Place the chicken about 4 inches from the broiler or directly over the fire.  If using a grill, cover it and cook on one side for about 4 minutes.  Flip the chicken breasts over and continue cooking, covered if using a grill, until tender and the juices run clear when the meat is pierced with a knife, about 4 minutes longer.  Set aside while the pasta cooks.

Fill an 8- to 10-quart stockpot two-thirds full of water and bring to a boil over high heat.  Add 1 tablespoon of salt to the boiling water, and then add the pasta.  Stir and cook the pasta until al dente (cooked through, but still slightly chewy), about 10 minutes.

While the pasta is cooking, cut the chicken into 1/2-inch wide strips and place in a large, warmed serving bowl.  Sprinkle the chicken with the rosemary and toss to combine.  Drain the pasta in a colander, but do not rinse, then add to the bowl along with the blue cheese.  Toss to combine, cover, and set aside briefly until the cheese partially melts.  Add the caramelized onions to the bowl, toss to combine, and season to taste with salt and pepper.  Serve immediately.

Taylor's Notes:
I don't know what it is about serving sizes, but I always feel like they must be determined based on feeding a pack of hungry large men who haven't eaten in days.  This recipe is supposed to serve four to six, however I halved the recipe and I guarantee I could have fed at least five.  So... do what you will, but be ready for leftovers.


Over all, the recipe was very easy to make and took about an hour from start to finish.  Definitely start with the onions as they'll take a good 25-30 minutes to cook down and caramelize.  You absolutely don't want to rush them or take them off too early.  The caramelizing gives them that great sweet taste.  While they're hanging in the skillet, prep the chicken and start the pasta water.  Once the water is boiling, put the chicken on the grill.  Since it's January and way too cold to use my outdoor grill, I used my grill pan and it worked perfectly.  The chicken truly takes only a few minutes per side if it's pounded thin and by the time the second side is getting its grill marks, the pasta will be done.


Serve it with a full-bodied red wine and some great crusty bread (speaking of 'love'...)


Enjoy!


May 2, 2010

... Blue Cheese Scallion Drop Biscuits

Supper Club #3... Grilled Pork Tenderloin, Wedge Salads, Cheesy Corn Bake, Blue Cheese Scallion Biscuits, Angel Food Cake with Strawberries and Whipped Cream.  I apologize for the lack of pictures of the other dishes... everything was too good to waste time taking pictures!

When this recipe hit my inbox from Smitten Kitchen, I couldn't wait to make them.  When can I make them?  Who should I make them for?  I want to make them NOW!  And then... Ding!  Supper Club!!


Honestly, she had me at "Blue Cheese" and "Biscuits."  Then when I saw it was a one-bowl recipe and took less than an hour to mix up the dough and bake the biscuits, it was a no brainer.  Now, if you're not a fan of blue cheese, you could use the same amount of grated cheddar - with or without the scallions.  Regardless of your preference, find a time to make these biscuits soon!


With their crunchy exterior and soft, crumbly interior these biscuits were a huge hit at supper club - as were all of the other dishes that we had! - and this recipe will stay within easy reach for a long time.  

Blue Cheese Scallion Drop Biscuits
makes one dozen

2 1/4 cups all-purpose flour
2 1/2 teaspoons baking powder
2 teaspoons sugar
3/4 teaspoon baking soda
1 teaspoon salt
6 tablespoons cold unsalted butter, cut into 1/2 inch cubes
1 1/2 cups crumbled blue cheese
4 scallions, finely chopped
1 cup well-shaken buttermilk

Preheat oven to 450 degrees.  Whisk together flour, baking powder, sugar, baking soda, and salt in a bowl, then blend in butter with your fingertips until mixture resembles course meal.  Stir in blue cheese and scallions. Add buttermilk and stir until just combined.

Drop dough in 12 equal mounds about 2 inches apart onto a buttered large baking sheet, or one lined with parchment paper.  Bake in middle of oven until golden, 16 to 20 minutes.

Taylor's Notes
When you're blending in the butter, just make sure that all the cubes are blended in with the dry ingredients.  The mixture doesn't really get to a 'course meal' consistency throughout, but as long as there aren't any chunks of butter you'll be good to go.


I only used the green tops of the scallions, none of the white-ish tips.  Smitten Kitchen mentioned adding one more scallion (5 total) so I did.  You could add it or not - depending on how much of that flavor you'd like in you biscuits.


I'd recommend lining your baking sheet with parchment paper.  I buttered the first sheet and the biscuits stuck a little.  I sprayed the second sheet with non-stick cooking spray and they stuck a little there, too.  Speaking of the second baking sheet... I did make two batches of the dough.  You could probably just double the recipe, but the dough gets pretty sticky, so I think two separate batches may be easier to handle.  Other than that, no more notes... except don't expect these biscuits to stick around too long after they come out of the oven!


Enjoy!

If you should end up with a few biscuits leftover the next morning...


fry an egg, warm up a biscuit and make a tasty breakfast sandwich that will make you want to stash a couple of biscuits even before you put them out the evening before.

April 8, 2010

... Blue Cheese-Stuffed Chicken with Buffalo Sauce

The fun thing about cooking is that it's not always perfect.  There's a lot of trial and error, several mistakes and it encourages you to bring out the creative side to fix what may not be just what you'd envisioned.  I found this recipe in Cooking Light and it had me at "blue cheese-stuffed."  It was a must-make if I'd ever seen one.  It seemed easy enough: mix up this gorgeous blue cheese scrumptiousness, stuff it in a chicken breast, coat it with breadcrumbs and cook it in the skillet.  What's difficult about that?  


This is where those mistakes I mentioned early come into play.  The recipe wasn't absolutely clear on how to cut the chicken.  Where do I put the pocket for the blue cheese?  On top?  In the side?  I went with the former as you can see above.  Then I proceeded with the rest of the recipe... dredge the chicken in flour, then in egg, then in Panko breadcrumbs.  Pop it in a skillet and cook it for a few minutes on each side.  Easy, right?  Well....


That's when the 'oops' set in.  I started to flip the chicken from side one to side two and what do you think happened to all that blue cheese scrumptiousness?  Yep, that's right... it came out in the pan.  Doh!  Lesson learned: when stuffing a chicken breast, make the pocket in the side of the chicken, not on top.  (Hey, I've never said I was a brilliant cook...)


So, while all that's going on, Rich had done a great job at making the Buffalo Sauce (although I'd more likely call it a tomato sauce) and we whipped up some blue cheese smashed red potatoes and broccolini to accompany the chicken.


The end result was actually pretty tasty... just not very blue-cheesy.  Next time I'll know better.


Blue Cheese-Stuffed Chicken with Buffalo Sauce
serves 4

1/2 cup (2 ounces) crumbled blue cheese
1 tablespoon reduced-fat sour cream
1 teaspoon fresh lemon juice
1/8 teaspoon freshly ground black pepper
4 (6 ounce) skinless, boneless chicken breast halves
1/4 cup all-purpose flour
2 tablespoons 2% reduced fat milk
1 large egg, lightly beaten
1 cup panko (Japanese breadcrumbs)
1 1/2 tablespoons butter, divided
6 tablespoons finely chopped drained bottled roasted red bell peppers
2 teaspoons water
1 teaspoon Worcestershire sauce
1 teaspoon minced fresh garlic
1/2 teaspoon hot sauce

Preheat oven to 350 degrees.

Combine first 4 ingredients in a small bowl.  Cut a horizontal slit through thickest portion of each chicken breast half to form a pocket.  Stuff cheese mixture evenly into pockets.

Place flour in a shallow dish.  Combine milk and egg in a shallow dish, stirring well with a whisk.  Place panko in a shallow dish.  Working with 1 chicken breast half at a time, dredge chicken in flour, then dip in egg mixture, dredge in panko.  Repeat procedure with remaining chicken, flour, egg mixture, and panko.

Heat a large ovenproof skillet over medium-high heat.  Add 1 tablespoon butter to pan; swirl until butter melts.  Arrange chicken in pan; cook 4 minutes or until browned.  Turn chicken over; place skillet in oven.  Bake at 350 degrees for 20 minutes or until done.

While chicken bakes, combine remaining 1 1/2 teaspoons butter, bell peppers, water, Worcestershire, and garlic in a small sauce pan over medium heat.  Bring to a simmer; cook until butter melts.  Remove from heat, and stir in hot sauce.  Serve sauce with chicken.

Taylor's Notes:
See above... make the pocket in the side of the chicken, not the top.  Other than that, just follow the recipe and Enjoy!

February 21, 2010

... Steak with Potato Salad and Blue Cheese Vinaigrette

I'm not really a steak and potatoes kind of girl.  I mean, sure, I like a good steak every once in a while, especially if Dad or Rich is grilling it, but I never really crave it.  When I was flipping through my latest issue of Real Simple this recipe popped out at me (it was most likely the words "Blue Cheese Vinaigrette" that actually did the popping) so I thought I'd give it a whirl.


With a few small changes, I think this recipe will stay in rotation throughout the year.  The salad was really good and very easy and would pair well with chicken, burgers, steak, or pork - or anything else you're little heart desires, I'm sure.


Steak with Potato Salad and Blue Cheese Vinaigrette
serves 4

1 pound small red potatoes (about 12)
kosher salt and black pepper
1/4 cup plus 1 tablespoon olive oil
4 small steaks (such as Newport, flat iron or top round, 1 1/2 pounds total)
1/4 cup crumbled blue cheese (about 1 ounce)
2 tablespoons white wine vinegar
1 small head Boston lettuce, torn (about 4 cups)

Place the potatoes in a large pot and add enough cold water to cover.  Bring to a boil and add 2 teaspoons salt. Reduce heat and simmer until tender, 14 to 16 minutes.  Drain, run under cold water to cool, and using a fork or your fingers, break the potatoes in half.

Meanwhile, heat 1 tablespoon of the oil in a large skillet over medium-high heat.  Season the steaks with 1 teaspoon salt and 3/4 teaspoon pepper and cook to the desired doneness, 4 to 5 minutes per side for medium-rare.

In a large bowl, combine the blue cheese, vinegar, the remaining 1/4 cup of oil, 1/2 teaspoon salt, and 1/4 teaspoon pepper.  Add the lettuce and potatoes and toss to coat.  Serve with the steaks.

Taylor's Notes:
I attempted to adjust the amount of potatoes I bought for just the two of us.  As it turns out, 5 medium size red potatoes ends up weighing about a pound and that actually ended up being a good portion for us.  If I were you, I'd just buy what you think you'll eat based on the number of people you're serving or how hungry you are.  I don't think the salad will keep very long with the lettuce dressed, but I have a bit leftover in my refrigerator so I'll let you know.  As for cooking the potatoes, I'd probably leave them on for 17 or 18 minutes.  You want them to be soft enough that you can easily cut them with a fork, but not soft enough to mash.  We cooked ours for 15 minutes and I think a couple more minutes would have been about perfect.  Again, that'll depend on the size of your potatoes.


We bought top round steak as the recipe calls for and, although it tasted good, it was a little tough.  I think we'll try this next time with a nice filet or something a little more substantial that we can grill outside.  The top round was kind of thin and cooked much quicker than the recipe says, so you'll want to adjust that per the type of steak you buy.


The salad was delicious and, as I mentioned, we'll be making that again in the coming months.  It's a great twist on the traditional potato salad with the Boston lettuce and vinaigrette dressing.  Adjust the amount of blue cheese you use to your liking as well.  I love blue cheese, so I'm guessing I used more like 1/2 cup or so of that in the dressing... and the extra chunks are delicious with a bite of steak!


Enjoy!