Showing posts with label fruit. Show all posts

June 23, 2013

... Berry Parfait

Summer has officially arrived (well, let's be honest, it arrived before it was actually 'official').  Although I try to watch what I eat most of the year, there's something about swimsuit season that really brings it home.  I refuse to give up desserts, though, no matter what time of year it is.  This one may not be entirely healthy, but it's certainly not completely guilt-inducing.  


Berry Parfait
serves 6 (individual) or 12 (in one pan)

Crust:
1 1/2 cups graham cracker crumbs (1 1/2 sleeves of graham crackers, crushed)
1/2 cup sugar
1/3 cup butter, melted

Combine all ingredients in a mixing bowl and mix well.  Press firmly in a 9"x13" baking dish (or individual parfait cups) and bake for 8 minutes at 350 degrees.  Cool.

Filling:
8 oz cream cheese, softened
1/4 cup sugar
2 tablespoons cold milk
8 oz Cool Whip, thawed

Beat cream cheese with sugar and milk until smooth; fold in Cool Whip.

Topping:
Berries!  Berries!  Berries!  I used one container each of strawberries and blueberries.

Spread filling mixture over graham cracker crust.  Top with berries.  Add a dollop of plain Cool Whip and a sprig of mint as garnish.

Taylor's Notes:
I've mentioned Pinterest a time or two, yes?  This recipe is an adaptation of one I  pinned.  I've linked the original recipe there, but I left out the vanilla pudding aspect of that recipe.  To me, it seemed like a little too much and I chose to make the berries shine rather than have them coated with pudding.  To pudding or not to pudding... that is your choice.  

Enjoy!

August 29, 2012

... Pineapple Mango Salsa

Oh, Summer, with all of your delicious, fresh flavors and reasons to get together with friends... a reason in and of itself to make a tasty snack.


This salsa pairs great with lightly salty tortilla chips - use blue corn for even more color! - or, as with most fresh salsas, as a great partner to chicken or fish.


Pineapple Mango Salsa
serves 8

1 whole pineapple, peeled and diced
1 whole mango, diced
1/2 whole medium red onion, finely diced
1 whole jalapeno, seeded and diced
fresh cilantro, chopped
1 whole lime, juiced
dash of kosher salt
dash of granulated sugar (optional)

Combine diced pineapple, mango, red onion, jalapeno, and cilantro.  Squeeze in lime juice and add salt and sugar if needed.  Stir to combine.  Serve within an hour with tortilla chips or on top of chicken or fish.

Taylor's Notes:
It's really as easy as that... and really really tasty.  Thanks Pioneer Woman!

Enjoy!

... Superfood Salad with Lemon Vinaigrette

It probably goes without saying that I'm a fan of cooking blogs and I think I've mentioned a time or two that I've found some great recipes on Pinterest.  Well, add this one to the list... maybe even the top of the list.


And if this is one of my favorite new recipes, then quinoa is one of my favorite new ingredients.  It's so versatile - sweet, savory, breakfast, dinner - and really quick and easy to make.  It has a ton of protein and few carbs.  Quinoa, I think I love you.


The ingredient list is a little random... oranges, black beans, corn, pomegranate, avocado.  But it all comes together so perfectly with a light, lemon vinaigrette.  On its own or as a side, this salad will be showing up in my kitchen on a regular basis.


Superfood Salad with Lemon Vinaigrette
serves 5

1/2 cup dry quinoa
1/3 cup red onion, chopped
1 orange, peeled, segmented, and chopped
1 avocado, chopped
1 cup canned black beans, rinsed and drained
1 cup pomegranate arils (about 1 pomegranate worth)
1 cup frozen corn, thawed
1/3 cup cilantro, chopped
salt and pepper

Cook quinoa according to package directions.  Set aside to cool.

Combine cooled quinoa with red onion, orange segments, avocado, beans, pomegranate arils, corn, cilantro, salt and pepper.  Pour Lemon Vinaigrette over the salad and stir to combine.  Serve cold or at room temperature.

Lemon Vinaigrette
2 lemons, juiced (you need 1/4 cup juice)
2 garlic cloves, finely minced
dash of sweetener (agave nectar, stevia, or white sugar)
salt and pepper
6 tablespoons extra virgin olive oil

Taylor's Notes:
This superfood salad is super easy... and super delicious!  I added grilled shrimp for a little extra oompf, but it'd be great without meat, too.  I didn't find the pomegranate seeds, so left them out.  I'm sure they'd add good color and flavor, but I didn't miss them and I'm not sure it'd be worth the work to dig them out of an actual pomegranate.  Who knows, though, let me know if you give it a shot!

Enjoy!


... Butterflied Pork Chops with Plum, Mint, and Jalapeno Salsa

I think I've mentioned that my family is great about trying new recipes.  We all love to cook and aren't overly picky eaters, so it's always fun getting together for a family meal.  And when it's summertime, more often than not, that meal involves grilling.  Weber has a great number of cookbooks with terrific recipes - an abundance of what to grill, how to grill it, and what to pair with it.  So, for a holiday as colorful as the Fourth of July, we thought it would be appropriate to have a equally colorful meal.


serves 4-6

4 center-cut butterflied pork loin chops, each about 10 ounces and 3/4- to 1-inch thick, trimmed of excess fat
1 1/4 teaspoons kosher salt, divided
4 ripe plums, cut into bite-sized pieces
1/2 medium jalapeno chile pepper, seeded and minced
1/3 cup finely chopped fresh mint leaves
1 1/2 teaspoons granulated sugar
1/4 teaspoon ground coriander
1/4 teaspoon ground black pepper
2 teaspoons extra-virgin olive oil

Season the pork chops on both sides with 1 teaspoon of the salt.  Allow the chops to stand at room temperature for 15 to 30 minutes.

Prepare the grill for direct cooking over medium heat (350 to 450 degrees).

In a medium bowl gently combine the plums, jalapeno, mint, sugar, coriander, pepper, and the remaining 1/4 teaspoon salt.  Set aside.

Lightly brush the pork chops on both sides with the oil.  Brush the cooking grates clean.  Grill the chops over direct medium heat with the lid closed as much as possible until they are still slightly pink in the center, 8 to 10 minutes, turning once or twice.  Remove from the grill and let rest for 3 to 5 minutes.  Serve warm topped with the salsa.

Taylor's Notes:
Make this when the plums are in their peak.  We had a tough time finding ripe plums, but did just fine with what we had.  It'd just be that much better with riper, juicier plums.  You could definitely pair this salsa with chicken or fish if you're not that big a fan of the other white meat.

Enjoy!


May 13, 2012

... Peach and Gorgonzola Chicken Pizza

You always want what you can't have.  I've been waiting a while for peaches to be in season so that I could make this pizza.  It's not a normal combo: peaches, chicken, and stinky cheese, but it sure is a good one.


It'll be difficult to not eat it all in one sitting, but if you save some for leftovers you'll be very glad you did.  The good news is that if you do indulge, you can feel a little less guilty as this is another terrific recipe from Cooking Light.


serves 4

1 (10-ounce) prebaked thin pizza crust (such as Boboli)
cooking spray
1 teaspoon extra-virgin olive oil
1/2 cup (2 ounces) shredded part-skim mozzarella cheese, divided
1 cup shredded cooked chicken breast
1/3 cup (about 1 1/2 ounces) crumbled Gorgonzola cheese
1 medium unpeeled peach, thinly sliced
1/3 cup balsamic vinegar

Preheat oven to 400 degrees.

Place pizza crust on baking sheet coated with cooking spray.  Brush 1 teaspoon extra-virgin olive oil evenly over crust.  Top evenly with 1/4 cup shredded mozzarella cheese, chicken, Gorgonzola cheese, and peach slices.  Top with remaining 1/4 cup mozzarella.  Bake at 400 degrees for 11 minutes or until crust browns.  

Place vinegar in a small saucepan over medium-high heat; cook until reduced to 2 tablespoons (about 5 minutes).  Drizzle balsamic reduction evenly over pizza.  Cut pizza into 8 wedges.

Arugula Salad
serves 4

Combine 1 teaspoon minced shallots, 2 teaspoons lemon juice, and 1/2 teaspoon honey in a large bowl; gradually whisk in 1 tablespoon extra-virgin olive oil.  Add 4 cups loosely packed arugula and 1/3 cup vertically sliced red onion to bowl; toss gently to coat.

Taylor's Notes:
I used a canned pizza dough instead of a prebaked dough.  You could also use your own homemade dough if you do that or purchase premade dough from your favorite pizza shop.  Just adjust the baking time accordingly.  I ended up baking my pizza for about 20 minutes.  

I actually completely forgot about the balsamic reduction until I just typed it out in the recipe.  Dang!  Good thing I have leftovers and can whip that up later today... see, it all works out in the end.

Enjoy!

May 8, 2012

... No Bake Raspberry-Lemon Cheesecake

When I stumbled across these on Pinterest, I knew they'd be perfect for Easter.  Easter?!  Yes, Easter... so I'm a little behind on the blog.  What?

Ahem, as I was saying, Jamie over at My Baking Addiction nailed it with this one.  The raspberries are perfect for Spring, the light whipped filling doesn't put you over the edge after a big holiday meal, and the fact that you can spend more time with your family and less time in the kitchen is never a bad thing.  (well, with most families... for sure with mine!)


No Bake Raspberry-Lemon Cheesecake
6 servings

For the Crust:
3/4 cup graham cracker crumbs
1 tablespoon sugar
3 tablespoons unsalted butter, melted

For the Filling:
2/3 cup sugar
zest of 2 lemons
1 (8 ounce) package cream cheese, softened
2 teaspoons fresh lemon juice
1 teaspoon pure vanilla extract
1 (8 ounce) tub frozen whipped topping, thawed
1 cup fresh raspberries, slightly mashed with a fork

In a medium bowl, stir together the graham cracker crumbs and 1 tablespoon of sugar and melted butter.  Evenly divide the crumbs between individual serving dishes and press into the bottoms of the dishes to form a crust layer.

In a large bowl, mix together the sugar and lemon zest until the sugar becomes moist and fragrant.  Add cream cheese and beat with an electric mixer until smooth.  Add lemon juice and vanilla, mixing to combine. Using a rubber spatula, fold in the whipped topping until well blended, then fold in the raspberries.

Evenly pipe or spoon the filling into individual serving dishes.  Cover with plastic wrap and refrigerate for at least 2 hours before serving.  If desired, garnish with fresh raspberries and a sprig of fresh mint.

Taylor's Notes:
It's as easy and delicious as it sounds.  And you know, probably pretty easy on the figure, too, if you use light whipped cream and third-less-fat cream cheese like I did... and only eat one serving, which isn't as easy.  I won't judge if you don't.


Enjoy!

December 26, 2011

... Cranberry Bars

Happy Holidays!  My (beautiful) sister made these for our family to snack on during Christmas weekend and they were delicious.  Perfect for a late-night snack, breakfast on Christmas morning, or, well, breakfast the day after Christmas.


I couldn't resist making them for my (amazing) neighbors.  Hence the reason I don't have a picture of these actually cut into bars.  It's all I could do to not dive into one... especially when they were hot out of the oven.


I hope you all had the merriest of holidays and have a happy happy happy new year!

Cranberry Bars
serves 15 (at least!)

1 (12 ounce) package whole cranberries
1 cup white sugar
3/4 cup water
1 package yellow cake mix
3/4 cup butter, melted
2 eggs
1 cup rolled oats
3/4 cup packed light brown sugar
1 teaspoon ground ginger
1 teaspoon ground cinnamon

In a saucepan over medium heat, combine the cranberries, white sugar, and water.  Cook, stirring occasionally until all of the cranberries have popped, and the mixture is thick, about 15 minutes.  Remove from heat, and set aside to cool.

Preheat the oven to 350 degrees.

In a large bowl, mix together the cake mix, melted butter, and eggs. Stir in the oats, brown sugar, ginger, and cinnamon.  Set aside about 1 1/2 cups of the mixture and spread the rest into the bottom of a 9x13 inch baking dish.  Pack down to form a solid crust, getting it as even as possible.  Spread the cooled mixture over the crust.  Pinch off pieces of the remaining mixture and place evenly over the cranberry layer.

Bake for 35 to 40 minutes in the preheated oven, until the top is lightly browned.  Cool in the pan for about 40 minutes before slicing into bars.

Taylor's Notes:
These are so easy, so good, and make your house smell amazing while they're baking and cooling.  Win. Win. Win.


I cooked the cranberries for 20 minutes and the bars for 35 minutes.  They're delicious cool and amazing when they're warm... say, for breakfast... with coffee.  Mmmm, now I'm wishing I had bought two bags of cranberries.


Enjoy!

November 29, 2011

... Cranberry-Pear Relish

What's Thanksgiving without cranberry relish?  Ok, to be honest, I'm not sure that we've ever actually had cranberry relish at our Thanksgiving dinner, but the tradition of it always makes it seem nice.  And, no, I'm definitely not talking about that stuff from the can.  (my apologies if that's your thing...)  So this year I set out to find a tastier version and, thankfully, I did just that.


Cranberry-Pear Relish
serves 6-8

1 small navel orange
1 (12-ounce) bag fresh or frozen cranberries
1 Bartlett pear, cored and cut into large chunks
1/2 cup light brown sugar
pinch kosher salt
3 tablespoons pecans, toasted and coarsely chopped

Wash and dry the orange.  Cut the orange into small wedges, including the peel, and put in a food processor.  Add the cranberries, pear, sugar, and salt.  Pulse until coarsely chopped.  Transfer to a bowl, cover, and refrigerate for at least 2 hours and up to 2 days.  Just before serving, stir in the pecans.

Taylor's Notes:
First things first... this makes a lot.  I'm not sure how much a serving technically is, but I doubled the recipe for our Thanksgiving gathering of 25 people and I bet we took down one-quarter of the relish.  Not that it wasn't good, it was!, but most people just don't need that much cranberry relish.


Based on the reviews of the original recipe, I was a little concerned about the bitterness of the orange peel.  Since I was doubling the recipe, I included the orange peel from one of the oranges and removed it from the other.  I really liked the end result, so maybe that's the way to go.  I'm sure it would be great without the peel, too, but I think the bitterness balances the tartness of the cranberries.


I've had leftovers a couple of times and am freezing the rest for Christmas dinner.  I'll let you know how it turns out!


Enjoy!

April 3, 2011

... Cayenne-Rubbed Chicken with Avocado Salsa

The near 90 degree temps in Kansas City today really made me want to fire up the grill.  Then I remembered that the winds were near 90 mph.  This recipe was the perfect solution to that and the fresh avocado salsa (plus the fresh mango I added, thankyouverymuch) was great for a pre-summer summer-like day.


Cayenne-Rubbed Chicken with Avocado Salsa
serves 4

coarse salt and ground pepper
1/4 teaspoon cayenne pepper
4 boneless, skinless chicken breast halves (6 to 8 ounces each)
2 tablespoons olive oil
1 medium red onion, finely diced
2 tablespoons fresh lime juice
1 Hass avocado, pitted and cut into chunks

In a small bowl, combine 1 teaspoon salt, 1/4 teaspoon pepper, and cayenne; rub all over chicken.

In a large skillet, heat oil over medium.  Add chicken, and cook until browned on the outside and opaque throughout, 8 to 10 minutes per side.

Meanwhile, in a medium bowl, combine onion and lime juice; set aside.  Just before serving, fold avocado chunks into onion mixture; season with salt and pepper.  Serve chicken topped with salsa.

Taylor's Notes:


As I mentioned, I added mango to the mix and it was such a great partner to the creamy avocado and sharp onion.  The recipe was quick and easy to make... for one, or many!


Enjoy!

... Blueberry Oatmeal Muffins

Blueberries, oatmeal, and muffins.  Three foods I love separately, but even more together.  These were really easy to make and, although the recipe indicates they're for 12- to 18-month olds (something I'm still trying to figure out), I think they're perfect for breakfast or a snack... whatever your age!


As soon as I finished making the batter, I realized I only had snowman muffin liners.  Considering I'm so completely over winter, I couldn't bring myself to use them.  I've always seen muffins wrapped in pretty folded parchment paper, so after a quick Google search for 'parchment muffin cups', I found this tutorial and decided to give it a shot.


It really was pretty easy (considering I only had 16 to make) and I think the end result is much better than a snowman liner any old day, but especially in April.


Blueberry Oatmeal Muffins
makes 16 muffins

1 2/3 cups quick-cooking oats
3 ounces all-purpose flour (about 2/3 cup)
2.33 ounces whole-wheat flour (about 1/2 cup)
3/4 cup packed light brown sugar
2 teaspoons ground cinnamon
1 teaspoon baking powder
1 teaspoon baking soda
3/4 teaspoon salt
1 1/2 cups low-fat buttermilk
1/4 cup canola oil
2 teaspoons grated lemon rind
2 large eggs
2 cups fresh or frozen blueberries
2 tablespoons all-purpose flour (only needed if using frozen blueberries; omit if using fresh)
cooking spray
2 tablespoons granulated sugar

Preheat oven to 400 degrees.

Place oats in a food processor; pulse 5 to 6 times or until oats resemble coarse meal.  Place in a large bowl.

Weigh or lightly spoon flours into dry measuring cups; level with a knife.  Add flours and next 5 ingredients (through salt) to oats; stir well.  Make a well in center of mixture.

Combine buttermilk and next 3 ingredients (through eggs).  Add to flour mixture; stir until just moist.

Toss berries with 2 tablespoons flour, and gently fold into batter.  Spoon batter into 16 muffin cups coated with cooking spray; sprinkle 2 tablespoons granulated sugar evenly over batter.  Bake at 400 degrees for 20 minutes or until muffins spring back when touched lightly in center.  Remove from pans immediately; place on a wire rack.

Taylor's Notes:


I know that with baking you're supposed to be very exact in your measurements, hence the actual weights of flour.  I haven't ever gotten into it that deeply, but I do make sure that my measurements are right on and I've never had any problems.  But, there they are just in case...


If you should choose to take on the parchment muffin liner challenge, here are a few tips I learned.  Spray the muffin tins lightly with non-stick spray.  Ironically, this will help the parchment stick.  It's not perfect, but it does help.  The downside is that the outside of your liners are then a little greasy when you take the baked muffins of the pan.  Be sure to make your folds flat so that the batter doesn't seep between the paper.  And finally, I used a scoop to put the batter into the cups.  Using one hand to hold the paper liner in place and the other to scoop the batter into the cup.  Two scoops per cup was the perfect amount.


These muffins came out very moist and the fresh blueberries are so delicious.  I think I'll attempt to freeze a few because, although they're not too bad for you, I don't think I should polish off 6 or 8 muffins before they go bad.  Swimsuit is just around the corner, you know.


Enjoy!


March 31, 2011

... Pears with Blue Cheese and Prosciutto

Remember when I wrote about this and I told you that you'd be seeing several upcoming posts as a direct result of it?  Well, here we go!

- ripe, organic pears -

- fresh, crisp arugula - 

It just so happened that I had Wine Club this week and needed a great little appetizer to take.  I stumbled across this recipe and knew it'd be a hit.  When I received pears and arugula in my bitty box delivery, I knew it was the one.  It's kismet, no?


The crisp arugula gets laid over a juicy pear wedge, topped with creamy blue cheese and wrapped with a salty slice of prosciutto.  


It makes quite a bit... but doesn't last for long!


Pears with Blue Cheese and Prosciutto
serves 8

2 pears (such as Bosc or Bartlett), each cut into 8 wedges
2 teaspoons fresh lemon juice
1 cup arugula
3 ounces blue cheese, cut into small pieces
6 ounces thinly sliced prosciutto, cut in half lenthwise

In a large bowl, toss the pears and lemon juice.

Layer a slice of pear, an arugula leaf, and a piece of cheese on a piece of proscuitto and roll up.

Taylor's Notes:


That's about it... it's as simple as it sounds.  Quick to make, quick to disappear.


Enjoy!

March 29, 2011

... Door to Door Organics

Have you heard of Door to Door Organics?  It's a local Kansas City company and I think I may be in love.  I heard about it a while ago when my awesome neighbors told me about it and I had every intention to join, but, in the end, it took a Groupon for me to pull the trigger.  And boy, am I glad I did. 


Soon I'll be enjoying fresh organic fruits and veggies every other week!  And I won't even have to go to the grocery store for them!  How exciting is that?!  Find one near you and you'll be over-using exclamation points just like me!  


This week I got arugula, green leaf lettuce, zucchini, bananas, an artichoke, pears, apples, and fingerling potatoes.  And you can bet they'll be showing up in posts very soon.  Come on, you know you're excited!

January 1, 2011

... Strawberry Champagne Cupcakes

My Aunt Steph saw these scrumptious little gems on Oprah and gave me the heads up.  I decided they'd be a perfectly festive treat to share with friends for New Years Eve, but they'd also be great for Valentine's Day, Fourth of July, or, you know, any old day that you want to indulge.


Tasty bright red strawberries soaking in pink champagne and then folded into delicious vanilla cake batter.


This was the first time I've ever used an actual vanilla bean.  It was really easy to slice open the bean and scrape out the seeds.  Not very pretty, but the aroma was amazing.  And see those little black specs in the batter?  That's fresh vanilla, folks.


Pretty.


Not so pretty.

Take note, when the recipe recommends to take the cupcakes out of the paper baking cups when you take them out of the oven, do it.  Don't think (as someone who shall remain nameless did) that you can let them cool and then take them out of the cups or they won't come out looking too lovely.  Luckily, after you put them in the champagne flutes and layer them with Champagne Buttercream Frosting, Champagne-soaked Strawberries, and Chocolate Ganache, they become pretty once again.


Strawberry Champagne Cupcakes 
36 mini cupcakes, 3 per champagne flute)

For the cupcakes:
1/2 cup fresh strawberries, diced
1/2 cup good Champagne (sweet rose Champagne suggested)
2 1/2 cups flour
1/2 teaspoon baking powder
1/4 teaspoon salt
4 tablespoons (4 ounces) unsalted butter
4 tablespoons (4 ounces) unsweetened applesauce
1 3/4 cups Splenda
2 large eggs
2 1/4 teaspoons vanilla extract, plus seeds from 1 vanilla bean
1 1/4 cups skim milk

For the Champagne Buttercream Frosting:
16 tablespoons (8 ounces) unsalted butter
4 cups powdered sugar
1 teaspoon skim milk
1 teaspoon vanilla extract
1/8 teaspoon salt
1/2 cup good Champagne (sweet rose Champagne suggested)

For the strawberry layer:
24 fresh strawberries
1 cup good Champagne (sweet rose Champagne suggested)

For the Chocolate Ganache*:
2 cups high-quality dark chocolate

Step 1: Baking the Mini Strawberry Champagne Cupcakes:
Preheat the oven to 350 degrees.  Line 2 mini cupcake pans with 36 mini baking cups or grease pans with butter if not using baking cups.

Dice 1/2 cup of fresh strawberries (I used 8 strawberries) and soak in 1/2 cup of Champagne.  Set aside.

Sift together flour, baking soda and salt in a bowl.  Set aside.

Place the unsalted butter in the bowl of a stand mixer or hand-held electric mixer.  Add the sugar; beat on medium speed until well incorporated.

Mix in applesauce slowly.

Add the eggs one at a time, mixing slowly after each addition.

Combine the vanilla extract, vanilla bean seeds, and milk in a large liquid measuring cup.  Set aside.

Reduce the speed to low.  Add one third of the flour mixture to the butter mixture, then gradually add one-third of the milk mixture, beating until well incorporated.  Add another one-third of the flour mixture, followed by one-third of the milk mixture.  Stop to scrape down the bowl as needed.  Add the remaining flour mixture, followed by the remaining milk mixture, and beat until just combined.

Gently fold in the diced Champagne-soaked strawberries, just until incorporated.  (do not include the champagne)


Scoop batter into baking cups and bake for 10 minutes or until a toothpick inserted into the center of a cupcake comes out clean.  Transfer the pan to a wire rack to cool completely.  If using paper baking cups, peel off all the paper baking cups from the cupcakes at this time.

Step 2: Making the Champagne Buttercream Frosting:
Place the unsalted butter in the bowl of a stand mixer or hand-held electric mixer.  Add the powdered sugar; beat on medium speed until well incorporated.

Add the vanilla extract, milk, salt, and Champagne, and beat on high speed until light and fluffy.  Place frosting in a disposable piping bag with a large round tip. (I put mine in a ziplock baggie and snipped the corner.)

Step 3: Preparing the strawberries:
Slice 24 strawberries lenthwise and soak in 1 cup of Champagne for approximately 10-15 minutes.  (don't soak for longer than that as you don't want the strawberries to get soggy)


Step 4: Making the Chocolate Ganache:
Break the dark chocolate into small pieces.  Fill a medium saucepan with an inch or two of water and place over medium-low heat.  Place the dark chocolate pieces in a medium glass bowl over the saucepan and melt slowly.  Stir occasionally until the chocolate is completely melted.  Remove the bowl of melted chocolate from the saucepan.  Pour the melted chocolate into a plastic squeeze bottle.
*I read a comment on Oprah's site about this ganache not being very easy to pipe and the commenter gave another recipe.  Here's what I did:
Bring 1 cup heavy whipping cream, 1/3 cup sugar (I used Splenda), 1/3 cup light corn syrup, and 1 1/2 teaspoons vanilla extract to a boil.  Stir constantly so the mixture doesn't burn.  Once it boils, remove it from the heat and add 12 ounces of dark chocolate chips.  Stir until chocolate is melted and mixture is smooth.  I used a ziplock baggie as a piping bag for this, too.


Step 5: Assembling layers in Champagne flutes:
Line up 12 Champagne flutes.  Insert 1 mini Strawberry Champagne Cupcake in the bottom of each glass.  Next, pipe a swirl of Champagne Buttercream Frosting on top of each cupcake.  Add several (or two) slices of Champagne-soaked strawberries (again, just the berries... not the Champagne) and a drizzle of Chocolate Ganache.  Repeat layers.  Finally, place a third mini Strawberry Champagne Cupcake at the top of each glass, pipe with a final swirl of Champagne Buttercream Frosting, and top with a final drizzle of Chocolate Ganache.

Taylor's Notes:
These little guys are very festive and were a hit with the people I shared them with, which makes it all worth it.  That said, though, they are pretty time consuming, kind of pricey when you consider all of the ingredients, and, maybe it was just me, but my kitchen was a mess!


The recipes (there was a standard recipe and a low-fat recipe) that were posted on Oprah.com were a little confusing.  Some of the directions didn't exactly tie in with the ingredients and there was some confusion with the amounts of some of the ingredients.  I followed the low-fat recipe to the best of my ability and the end result was good.  The cupcakes, however, were kind of dense and I wonder if that might be because one recipe called for 1/2 teaspoon of baking powder and the other called for 2 1/2 teaspoons.  I opted for 1/2 teaspoon and I think that could be why the cupcakes weren't too fluffy. All in all, though, they tasted good.


I finished these up at about noon and delivered them around 3:30pm.  I kept them in the refrigerator until then and even had one at midnight with our Happy New Year! toast.  I don't think they'd keep much longer than that, though.  Also, I had enough batter to make 48 mini cupcakes and could fill 16 flutes.


If I make these again, I think I'll try full-size cupcakes and then cut the cupcake in half and layer the frosting, strawberries, and ganache that way.  They'd be a mess to eat, but probably pretty cute!


Enjoy and Happy New Year!!


And... for those of you who like to refer to me as 'Martha' or 'Betty'... I thought you might enjoy seeing what happened with almost half of the batch of Strawberry Champagne Cupcakes after they were all dolled up and ready to be delivered...


Man down!  The box missed the counter by about an inch.  Oops.  After I cleaned up the mess, I decided I deserved this...


Happy New Year!  I hope you all have a fabulous 2011!

December 13, 2010

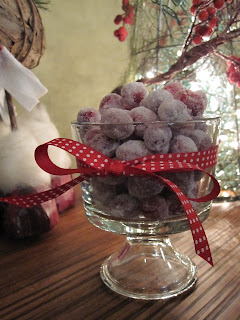
... Sugared Cranberries

'Tis the season for munching and snacking, fa la la la la la la la la.

It seems that everywhere you turn there's a cookie, a brownie, a truffle... amiright?  And, if you're anything like me, they don't last for long.  Well, here's another little tasty treat that's perfect for the holiday season.


Fresh, juicy and tart cranberries soaked in simple syrup and rolled in superfine sugar...


They're sweet and tart and the perfect size to pop in your mouth put in a pretty dish to have for guests...


... or package up and take to friends.


And who doesn't like a little sweet and tart in between their chocolate?!?

Serves 9 (about 1/3 cup each)

2 cups granulated sugar
2 cups water
2 - 3 cups fresh cranberries (1 12-oz bag)
3/4 cup superfine sugar (also called Baker's Sugar)

Combine granulated sugar and water in a medium saucepan over low heat, stirring mixture until sugar dissolves.  Bring to a simmer; remove from heat (do not boil or the cranberries may pop when added).  Wash cranberries and pick them over, discarding any with soft spots.  Stir cranberries into the sugar mixture; pour mixture into a bowl.  Cover and refrigerate 8 hours or overnight.

Drain cranberries in a colander over a bowl.  Discard syrup.  Place superfine sugar in a shallow dish.  Add the cranberries, rolling to coat with sugar.  Spread sugared cranberries in a single layer on a baking sheet; let stand at room temperature for one hour or until dry.

Taylor's Notes:
These truly are as easy as they seem, however if you make 12 times as many (like I may or may not have), it'll take you a bit of time.  

When adding the cranberries to the superfine sugar, add only a few big spoon fulls of cranberries at a time so that they aren't too crowded and are sure to get covered completely.  

These should last at least a week at room temperature... if you can keep yourself from snacking on them, that is.

Enjoy and Happy Holidays!

September 9, 2010

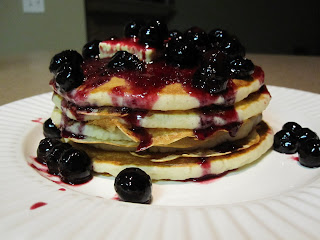
...Pancakes with Blueberry Sauce

Ok, whoever came up with the idea of breakfast for dinner is brilliant.  I mean, the kind of brilliant that deserves a medal.  Or a hug, a big, big hug.

Today was a dreary, drizzly, kind of cool, almost Fall kind of day... the perfect kind of day for comfort food.  And so it became clear, on my drive home, that I should make pancakes.  And I should make them with a wonderfully decadent blueberry sauce.  And so I did.


And it was the best decision I'd made all day.  Even the dogs agree!


Now, there's really not much to making pancakes and I would assume that most people have their favorite recipe.  So, I'm not going to tell you how I used Aunt Jemima mix, added and egg, some milk, and a little oil and had the best pancakes I've ever made.  But what I can do is give you a few tips and tricks to help you get great pancakes on your plate every time.  
  1. If you can get my dad to make them for you, do it.  He's the best pancake maker ever.  Seriously.
  2. If you can't, follow these simple rules...
    1. Make sure your pan is hot enough.  Heat it over medium to medium-high heat.  Not too hot or your pancakes will be crisp on the outside and gooey in the middle.  Yuck.  A good trick is to sprinkle water on the pan.  When the water bubbles up and sizzles away, your pan is hot enough.
    2. Don't crowd your pancakes.  Depending on the size of your pan, only pour the batter for two or three at a time.  
    3. Let them be!  Your batter will bubble up and you'll be able to see the edges start to form.  Only then should you flip them.  And when you do, they'll be a beautiful golden brown.


Now don't get me wrong, I love a good pancake with butter and syrup just like the next girl, but sometimes you just want a little something extra.  Take a look at this and tell me if that's not a little something extra...


1/2 cup sugar
3 tablespoons unsalted butter
2 cups berries or other ripe fruit - apples, pears, bananas, peaches, etc...

Combine 1/2 cup water with the sugar and butter in a heavy-bottomed medium saucepan over medium-high heat and cook, shaking and stirring, until the mixture is thick and syrupy but not browned.

Toss in the fruit and cook over low heat until the fruit begins to break up and release its juices, about 2 minutes for berries, longer for other fruit.  Press fruit through a fine-mesh strainer or run it through a food mill to puree and remove any skins or seeds.  Serve warm or at room temperature.  This sauce keeps well, refrigerated, for up to a week.

Taylor's Notes:

I had no doubt that I'd find the recipe I needed in my How to Cook Everything cookbook.  That book should seriously be in everyone's cookbook collection.

I followed the recipe exactly (with the exception of halving it) and it came out perfectly.  Oh, I also didn't press the fruit through a strainer or puree it as I wanted some whole fruit on my pancakes.  But other than that, I followed the other steps to a tee.  

Getting the butter / sugar / water mixture to thicken took about 5 minutes after the butter melted.  As you can see in the pictures above, it'll all melt, then foam, and then thicken.  I added the blueberries and tossed them around for about two minutes and then took the pan off the heat and let it set until my pancakes were done.  

It was easy and then end result had me wishing I hadn't fed the rest of the pancakes to the dogs. 

Enjoy!


September 7, 2010

...Pepper Jack, Chicken, and Peach Quesadillas

Oh, wow.  This is a new favorite recipe.  If you know me very well, you know that I'm not a girl who enjoys leftovers.  I made this for dinner last night and again for dinner tonight.  Enough said.


The minute this recipe appeared in my inbox I knew I had to try it.  This is the perfect time of year, too, when the peaches are ripe, juicy and fragrant.  The blending of the spicy pepper jack cheese and the sweet peaches is, well, perfect.


I literally just finished dinner (yes, I had this for the second time this week and, yes, it's only Tuesday) and now these pictures are making me hungry for another.  No... I'm not having another tonight... but there's always tomorrow.   


Pepper Jack, Chicken, and Peach Quesadillas
serves 4

1 teaspoon honey
1/2 teaspoon fresh lime juice
1/2 cup reduced-fat sour cream
4 (8-inch) flour tortillas
3/4 cup (3 ounces) shredded Monterey Jack cheese with jalapeno peppers
1 cup chopped, skinless, boneless rotisserie chicken breast
1 cup thinly sliced peeled firm ripe peaches
4 teaspoons chopped fresh cilantro

Combine honey and lime juice in a small bowl, stirring well with a whisk.  Stir sour cream into honey mixture; cover and chill until ready to serve.

Place tortillas flat on a work surface.  Sprinkle 3 tablespoons cheese over half of each tortilla; top each tortilla with 1/4 cup chicken, 1/4 cup peaches, and 1 teaspoon cilantro.  Fold tortillas in half.

Heat a large nonstick skillet over medium-high heat.  Coat pan with cooking spray.  Place 2 quesadillas in the pan, and top quesadillas with a cast-iron or other heavy skillet.  Cook 1 1/2 minutes on each side or until tortillas are crisp and lightly browned.  Remove quesadillas from pan; set aside, and keep warm.  Repeat procedure with the remaining quesadillas.  Cut each quesadilla into wedges.  Serve with sauce.

Taylor's Notes:


These were so good and easy.  The pepper jack cheese and the sweet peaches... rotisserie chicken, (hello! time saver), and the honey-lime sour cream... definitely don't skip that part!  


A tasty, quick, and simple meal that's easy to make for one or more - just reduce (or eyeball as I do) the ingredients based on how many you're serving.  Or, be sure you have plenty of ingredients on hand so you can have it again and again... and perhaps, again!


Enjoy!

... Peach Shortbread

Bars are never something that I think about too much when I'm in the mood to bake.  I'm not sure why... there are so many varieties and they're usually pretty easy to make (and the fact that I just posted on Lemon Bars kind of makes this whole paragraph a lie... but we won't go there).  Regardless, when I came across this recipe I knew it was definitely one I wanted to try.


Peaches, shortbread, brown butter... love, yum, ok!  I've never had anything bad from her site so I had no doubt this time would be any different.


And I was right.  These were easy as... well, I would say pie... but these are way easier than pie.


Peach Shortbread


1 cup white sugar
1 teaspoon baking powder
2 3/4 cups plus 2 tablespoons all-purpose flour
1/4 teaspoon cinnamon
1/8 teaspoon grated nutmeg
1/4 teaspoon salt
1 cup cold unsalted butter
1 large egg
2 peaches, pitted and thinly sliced (between 1/8- and 1/4-inch thick)

Brown your butter:  Melt butter in a small/medium saucepan over medium-low heat.  It will melt, then foam, then turn clear golden and finally start to turn brown and smell nutty.  Stir frequently, scraping up any bits from the bottom as you do.  Keep your eyes on it; it burns very quickly after it browns and will the very second that you turn around to do something else.  Set it in the freezer until solid (about 30 minutes).


Preheat oven to 375 degrees.  Butter a 9x13 inch pan, or spray it with a nonstick spray.  In a medium bowl, stir together sugar, baking powder, flour, salt, and spices with a whisk.  Using a pastry blender, fork, or your fingertips, blend the solidified brown butter and egg into the flour mixture.  It will be crumbly.  Pat 3/4 of the crumbs into the bottom of the prepared pan, pressing firmly.  Tile peach slices over crumb base in a single layer. Scatter remaining crumbs evenly over peaches and bake in preheated oven for 30 minutes, until top is slightly brown and you can see a little color around the edges.  Cool completely in pan before cutting into squares.

Taylor's Notes:
I'm still getting the hang of browning butter, so I keep trying knowing what an incredible difference it makes.  It's certainly something that takes some practice and patience to get it brown, but not burn it.  You can make this recipe with softened butter instead and it will be good, but man, what a difference brown butter can make.


I definitely think the best way to blend the flour mixture with the butter and egg is to start with a fork and then use your fingertips.  It's messy, yes, but isn't that the fun of baking??  


Enjoy!