Showing posts with label light. Show all posts

November 10, 2017

... Chicken Verde Stew with Hominy

Hello, my name is Taylor.  It's been four years, four months, and seventeen days since my last blog post.  But I can promise it hasn't been that long since my last meal...

OMG, you guys!  How has it been so long??  I'm anxious to get back to posting about my favorite thing, food... so bear with me as I dust off the ol' blogging skills and try a few new recipes out on you.  

For my (re)debut, I made Chicken Verde Stew and you guys, it was everything I'd hoped it would be.  Warm for a super cold Kansas City night, filling, because well, we're trying to start watching our waistlines around here, and fun to make!  

I started by roasting Anaheim Chiles and Tomatillo Peppers - two things that I've never cooked with.  If this might be your first time, too, let me give you just a couple quick lessons learned from my experience.  First, depending on your oven, you may need more than 5 minutes to roast the Anaheim Chiles.  When I do it next time, I'll leave those babies in there just a minute or two longer to get a better char on the skin and make the skin easier to peel off.  


Second, do your research on how to buy Tomatillo Peppers.  After a quick Google search, I learned that you can peel back a little bit of the husk to make sure the flesh is firm and bright green.  Toss it back in the pile if it looks dried up or blemished.


And it certainly wouldn't hurt to throw a few extra into the bag just in case you accidentally pick up one or two that look like this one...


I'm pretty pumped to have stepped into the world of Tomatillos.  I love a good green salsa, so now I feel like I'm armed and ready to whip up some of my own.  

Here's another tip - make sure you prep everything in the recipe before you start cooking.  It seems like a no-brainer, and it's something I nearly always do.  Today, however, I had 'Friday Brain' or maybe 'I'm So Excited to Roast These Peppers Brain' that I didn't.  It's not the end of the world if you don't, obviously, but it'll make trying new recipes and cooking so much more enjoyable... and will also give you a minute to take a sip of your beverage of choice.  You know, if you like that sort of thing.  

So, chop all the veggies and get them into that pot.  I've spared you a picture of the raw chicken thighs because, well, gross.  And I think we all know what raw chicken looks like.  You're welcome.  


Before too long, you'll get this.  Look at that!  The peppers add a good bit of spice.  Nothing too hot, just a great bite and a little bit of heat.  The veggies and hominy make it almost feel a little bit like a chili and it's a little thicker like one, too, more than a soup.  I've never been a big fan of dark meat, but the thighs just have so much flavor and really take it up a notch from what I would imagine a regular ol' chicken breast might.  


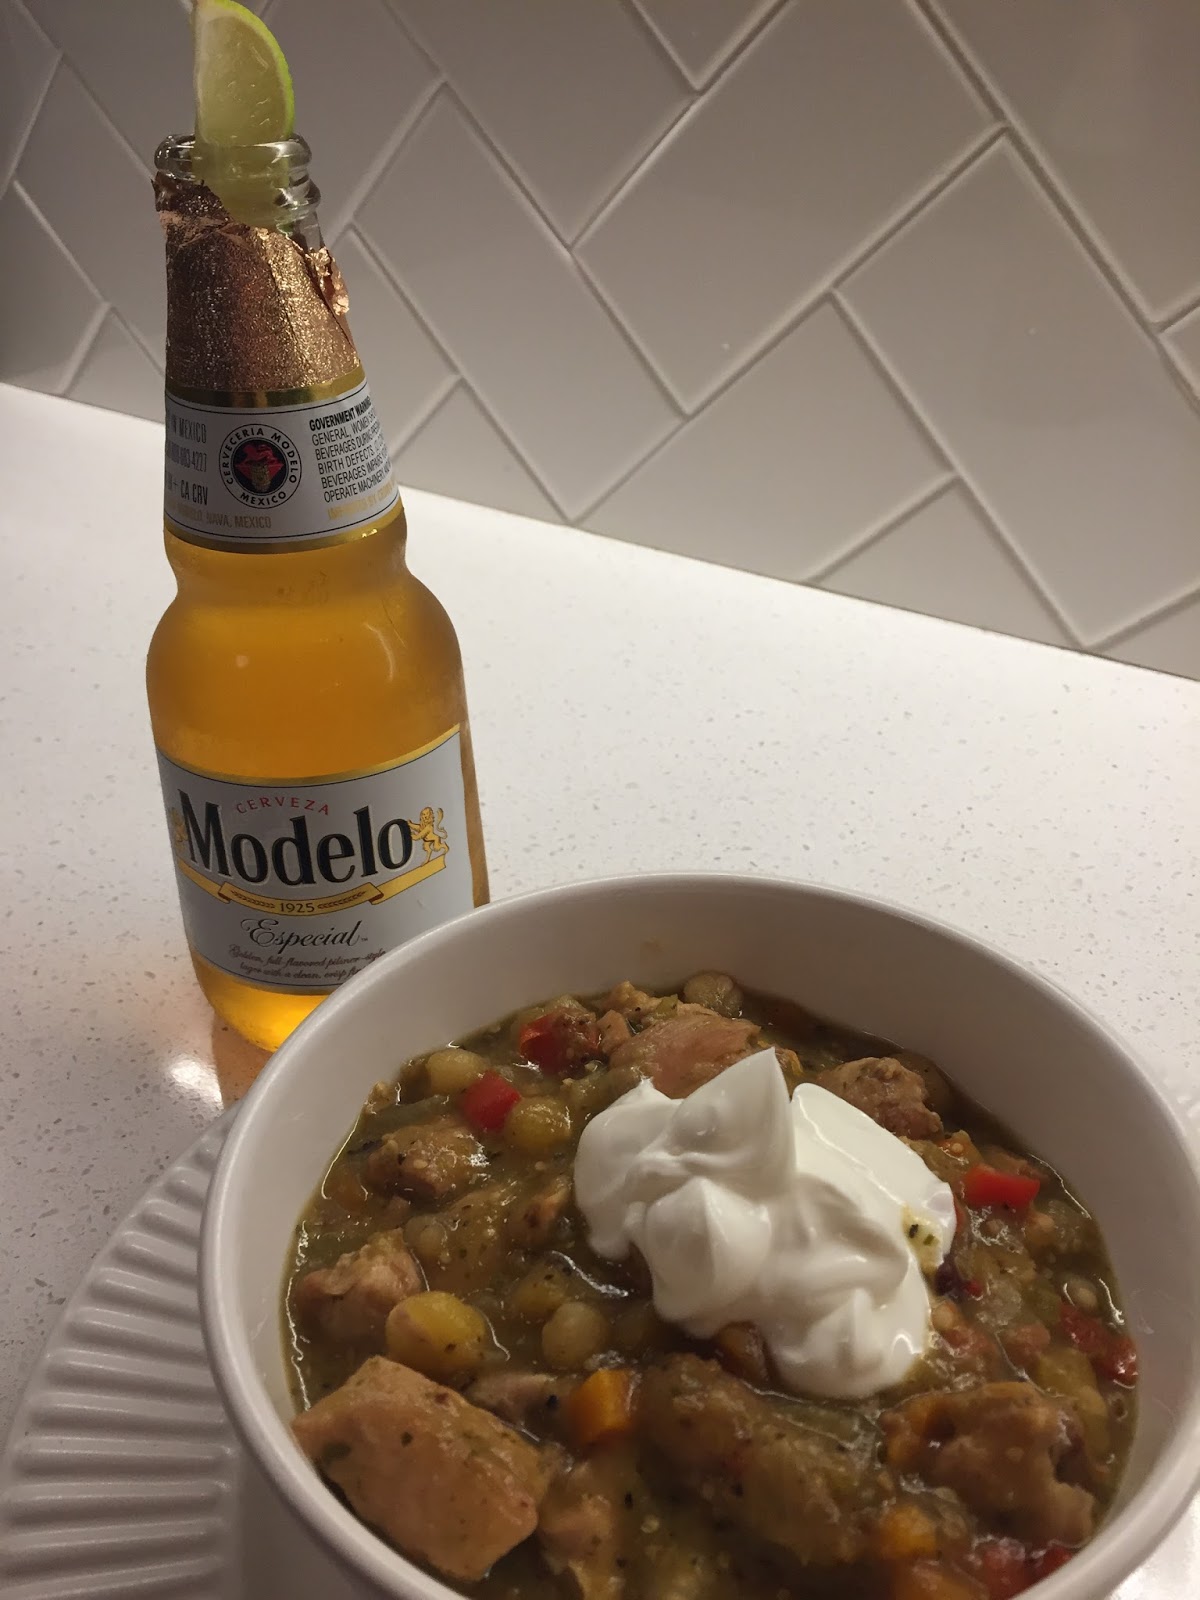
Serve it with a dollop of sour cream, a side of chips (not shown because we tend to just take the bag to the table with us), and a cold Mexican beer and you've got yourself one heck of a dinner.  Shoot, there goes that whole waist-watching thing... 


serves 6

2 Anaheim Chiles
Cooking Spray
1 1/2 pounds Tomatillos
1/4 cup finely chopped fresh cilantro
1 1/2 teaspoons ground cumin
1 teaspoon dried oregano
2 cups fat-free, lower-sodium chicken broth, divided
2 tablespoons olive oil, divided
1 1/2 cups finely chopped onion
1/2 cup chopped carrot
1/2 cup chopped celery
1/2 cup chopped red bell pepper
3 tablespoons all-purpose flour
4 teaspoons finely chopped garlic
1 pound skinless, boneless chicken thighs, cut into 1 1/2-inch pieces
3/4 teaspoon kosher salt, divided
1/2 teaspoon black pepper, divided
1 (29-ounce) can golden hominy, rinsed and drained
6 tablespoons reduced-fat sour cream 
cilantro leaves (optional)

Preheat broiler to high.

Halve, stem, and seed chiles.  Place chiles, skin side up, on a foil-lined baking sheet coated with cooking spray; broil for 5 minutes or until charred.  Place chiles in a paper bag; seal.  Let stand for 15 minutes.  Peel and discard skins.  Arrange tomatillos on a prepared baking sheet, and broil 14 minutes or until blackened, turning once.  Combine the chiles, tomatillos, 1/4 cup cilantro, cumin, and oregano in a blender.  Add 1 cup broth; process until smooth.

Heat a large Dutch oven over medium-high heat.  Add 2 teaspoons olive oil; swirl to coat.  Add onion, carrot, celery, and bell pepper; saute for 2 minutes, stirring occasionally.  Stir in flour; saute for 2 minutes, stirring frequently.  Add garlic; saute for 30 seconds, stirring constantly.  Place onion mixture in a large bowl.  

Sprinkle chicken with 1/2 teaspoon salt and 1/4 teaspoon black pepper.  Add 2 teaspoons oil to pan; swirl to coat.  Add half of chicken; saute 3 minutes.  Add browned chicken to onion mixture.  Repeat procedure with remaining chicken and 2 teaspoons oil.  Combine remaining 1 cup broth, tomatillo mixture, onion mixture, and hominy in pan over medium-high heat, and bring to a boil.  Cover, reduce heat, and simmer for 45 minutes, stirring occasionally.  Stir in 1/2 teaspoon salt and 1/4 teaspoon black pepper. 

Taylor's Notes...
I didn't have a paper bag on hand to steam the chiles in, so I used a tupperware bowl with a lid.  Worked great.

I read a review on the original recipe that someone used white hominy instead of golden.  I had to buy two cans to get to the 29 ounces, so used one of each.  I liked the additional color it added - and actually, have no idea if the two taste differently or not.  Perhaps I should have tasted both before tossing them into the stew, but hey, if you ask me, it worked out!

Enjoy!


August 29, 2012

... Seared Sea Scallops with Summer Vegetables and Buerre Blanc

This is one of those brilliant recipes that looks and tastes pretty darn impressive, but is, for the most part, very simple to put together.  That's a win-win in my book.


There's a first time for everything and this was mine for searing scallops.  They didn't get quite as caramelized as I'd have liked, but they sure didn't lack in flavor.  Thanks for your help, Dad!

serves 4

1/2 cup dry white wine
1/4 cup chopped shallots
3 tablespoons chilled butter, cut into small pieces
1/2 teaspoon grated lemon rind
5/8 teaspoon kosher salt, divided
1 medium zucchini
1 medium yellow squash
1 orange bell pepper, cut into 1-inch pieces
1 small red onion, cut into wedges
2 tablespoons olive oil, divided
1 cup grape tomatoes
3 garlic cloves, thinly sliced
1/2 teaspoon black pepper, divided
1 1/2 pounds sea scallops
1/4 cup small basil leaves

Place a jelly-roll pan in the oven.  Preheat oven to 500 degrees (leave pan in oven as it preheats).

Combine wine and shallots in a small saucepan; bring to a boil.  Cook 6 minutes or until mixture is reduced to 2 tablespoons.  Strain through a sieve into a bowl; discard solids.  Return mixture to pan.  Gradually add butter, stirring with a whisk until smooth and emulsified.  Stir in rind and 1/8 teaspoon salt; keep warm.

Cut zucchini and yellow squash in half lengthwise.  Cut each half crosswise into 3 pieces; cut each piece lengthwise into 4 strips.  Combine zucchini, squash, bell pepper, onion, and 1 tablespoon oil in a large bowl; toss to coat.  Arrange vegetable mixture carefully onto preheated jelly-roll pan.  Bake at 500 degrees for 4 minutes or until vegetables are lightly browned.  Remove from oven; sprinkle with 1/4 teaspoon salt and 1/4 teaspoon black pepper.

While vegetables cook; heat a large cast-iron skillet over high heat.  Pat scallops dry with paper towels; sprinkle evenly with remaining 1/4 teaspoon salt and 1/4 teaspoon black pepper.  Add remaining 1 tablespoon oil to pan; swirl to coat.  Add scallops to pan; cook 1 1/2 minutes on each side or until scallops are seared and desired degree of doneness.  Serve scallops with vegetable mixture and sauce; garnish with basil leaves.

Taylor's Notes:
Definitely take the time to prep your veggies first.  After they're ready and the sauce is made, the rest of the recipe moves pretty quickly.  Depending on how many vegetables you have or what size they are, they may take a little more time than 4 minutes.  We kept ours in the oven for about 15, but also had larger veggies and an additional pepper or two.  Keep an eye on them and start the scallops when you're about five or six minutes out.  It won't hurt the veggies to sit for a minute or two, but you definitely want the scallops to be hot.

Enjoy!

... Superfood Salad with Lemon Vinaigrette

It probably goes without saying that I'm a fan of cooking blogs and I think I've mentioned a time or two that I've found some great recipes on Pinterest.  Well, add this one to the list... maybe even the top of the list.


And if this is one of my favorite new recipes, then quinoa is one of my favorite new ingredients.  It's so versatile - sweet, savory, breakfast, dinner - and really quick and easy to make.  It has a ton of protein and few carbs.  Quinoa, I think I love you.


The ingredient list is a little random... oranges, black beans, corn, pomegranate, avocado.  But it all comes together so perfectly with a light, lemon vinaigrette.  On its own or as a side, this salad will be showing up in my kitchen on a regular basis.


Superfood Salad with Lemon Vinaigrette
serves 5

1/2 cup dry quinoa
1/3 cup red onion, chopped
1 orange, peeled, segmented, and chopped
1 avocado, chopped
1 cup canned black beans, rinsed and drained
1 cup pomegranate arils (about 1 pomegranate worth)
1 cup frozen corn, thawed
1/3 cup cilantro, chopped
salt and pepper

Cook quinoa according to package directions.  Set aside to cool.

Combine cooled quinoa with red onion, orange segments, avocado, beans, pomegranate arils, corn, cilantro, salt and pepper.  Pour Lemon Vinaigrette over the salad and stir to combine.  Serve cold or at room temperature.

Lemon Vinaigrette
2 lemons, juiced (you need 1/4 cup juice)
2 garlic cloves, finely minced
dash of sweetener (agave nectar, stevia, or white sugar)
salt and pepper
6 tablespoons extra virgin olive oil

Taylor's Notes:
This superfood salad is super easy... and super delicious!  I added grilled shrimp for a little extra oompf, but it'd be great without meat, too.  I didn't find the pomegranate seeds, so left them out.  I'm sure they'd add good color and flavor, but I didn't miss them and I'm not sure it'd be worth the work to dig them out of an actual pomegranate.  Who knows, though, let me know if you give it a shot!

Enjoy!


June 15, 2012

... Creamy Avocado Dip

This delectable little snacker is brought to you by me (with love) via Pinterest (of course) via Two Peas and Their Pod (how cute is that name?).


It's every bit as good as guacamole, with a brighter flavor and it's just as quick to whip up.  I'm pretty sure this will become a staple in my house this summer!


Creamy Avocado Yogurt Dip
serves 4

1/2 cup plain fat-free Greek yogurt
2 ripe avocados, peeled and seeded
1 clove garlic, minced
3 tablespoons chopped fresh cilantro
1 tablespoon finely chopped, seeded jalapeno
2 tablespoons fresh lime juice
1/4 teaspoon ground cumin
s&p to taste

Place the yogurt, avocados, garlic, cilantro, jalapeno, lime juice, and cumin in blender or food processor.  Mix until smooth.  Season with salt and pepper to taste.

Serve with pita chips, tortilla chips, or fresh cut veggies.

Taylor's Notes:
Although I did roughly chop the garlic and jalapeno, I didn't worry about how fine of a chop since they were going straight into my food processor.  I used the juice from two small limes and really eyeballed the cilantro and jalapeno.  Just taste it and add more or less depending on what flavors you like best.  And I dare you to not go through an entire bag of pita chips just so you can eat as much of this as possible.  Yep, it's that good.


Know what else is good?  Using it as a spread on a turkey sandwich with Provolone, tomato, sprouts, and a little bacon.  Want proof?  Take a look at this...


Enjoy!


May 21, 2012

... Pinto, Black, and Red Bean Salad with Grilled Corn and Avocado

Let it be known that, as of right now, this recipe will be known as "The recipe with the longest name ever."  It's ok, though, and let me show you why...


If that doesn't scream SUMMER BARBEQUE!, I don't know what does.  Except maybe this, paired with a grilled burger, potato chips, fresh fruit, and a cold beer.  


Pinto, Black, and Red Bean Salad with Grilled Corn and Avocado
serves 12

1 cup halved heirloom grape or cherry tomatoes
1 teaspoon salt, divided
3 ears shucked corn
1 medium white onion, cut into 1/4-inch-thick slices
1 jalapeno pepper
1 tablespoon olive oil
cooking spray
1/3 cup chopped fresh cilantro
1/3 cup fresh lime juice
1 (15-ounce) can no-salt-added pinto beans, rinsed and drained
1 (15-ounce) can no-salt-added black beans, rinsed and drained
1 (15-ounce) can no-salt-added kidney beans, rinsed and drained
2 diced peeled avocados

Preheat the grill to medium-high heat.

Place the tomatoes in a large bowl, and sprinkle with 1/2 teaspoon salt.  Let stand 10 minutes.

Brush corn, onion, and jalapeno evenly with oil.  Place vegetables on grill rack coated with cooking spray.  Grill corn for 12 minutes or until lightly charred, turning after 6 minutes.  Grill onion slices and jalapeno 8 minutes or until lightly charred, turning after 4 minutes.  Let vegetables stand 5 minutes.  Cut kernels from cobs.  Coarsely chop onion.  Finely chop jalapeno; discard stem.  Add corn, onion, and jalapeno to tomato mixture; toss well.  Add remaining 1/2 teaspoon salt, cilantro, and next 4 ingredients (through kidney beans) to corn mixture; toss well.  Top with avocado.

Taylor's Notes:
The only bad thing about this salad is that it's not too easy to make ahead of time, but the grilled vegetables are totally worth it.  It makes a lot - definitely serves more than twelve as a side - and is best the same day, but not too shabby the next.


Notice anything different down there??  Yep, I'm now going to add nutritional information to the ol' blogaroo.  Well, at least to the recipes that already have it listed... let's not get all crazy and think I can come up with this stuff on my own.  Why recreate the wheel when Cooking Light does such a bang-up job?


Enjoy!


Nutritional Information...
Calories 141  |  Fat 6.4g   Protein 5g   Carbs 18.2g  |  Fiber 6.8g  |  Sodium 211mg

March 12, 2012

... Brownie Cookies

Brownie Cookies?  What could be better than that?!  Oh, I don't know, perhaps say, light brownie cookies?  Yes, you heard me right.  My new favorite cookbook wins again.  Yea new cookbook!


Sisters, brothers-in-law, and super adorable two-year-old nephews alike all love this amazing, chocolate, cookie.  You will, too, I promise.


Brownie Cookies
makes 34

12 ounces bittersweet chocolate, finely chopped
1/2 cup all-purpose flour
1/4 teaspoon baking powder
1/4 teaspoon salt
6 tablespoons unsalted butter, room temperature
1/2 cup granulated sugar
1/2 cup packed light-brown sugar
3 large eggs
1 teaspoon pure vanilla extract

Preheat oven to 350 degrees.  Place chocolate in a heatproof bowl set over (not in) a saucepan of simmering water.  Stir until melted, then remove bowl from heat and let cool.

In a small bowl, whisk together flour, baking powder, and salt.  In a large bowl, using an electric mixer, beat butter and both sugars on medium-high speed until fluffy.  Add eggs and vanilla and beat until combined.  With mixer on low speed, add chocolate and flour mixture in alternating batches; mix just until combined after each (do not overmix; the consistency will be more like brownie batter than stiffer cookie dough).

Drop dough by heaping tablespoons, about 2 inches apart, onto two parchment-lined baking sheets.  Bake, rotating sheets halfway through, until a toothpick inserted in center of a cookie comes out clean, 14 to 16 minutes.  Transfer cookies to a wire rack to cool completely.  (Cookies can be stored in an airtight container at room temperature up to 4 days.)

Taylor's Notes:
In one word... delicious.  I may have made a slight misjudgement on the size of the cookie as my batch only made 17... oops!  Still, I'm guessing a double-size cookie is less than one brownie of this deliciousness.  


Enjoy!

... Lighter Chicken Enchiladas

I love new cookbooks.  Shocker, I'm sure.  I especially love new cookbooks that are kind of sequels to a favorite cookbook that I already have and are dubbed "light".  Win win.  If you're in the market for a new one, I'd highly recommend Everyday Food : Light... the sister of Everyday Food : Great Food Fast.  Really, you should own both, because they're both excellent... yes, do that, buy both.


Look at that sauce!  That light (!) sauce!  Don't you just want to dip your finger in it?


I honestly think that you could use this chicken mixture as the topping for nachos or put it in tacos, but it's really good rolled in corn tortillas and doused in sauce and topped with cheese... with a little dollop of light sour cream.


Lighter Chicken Enchiladas
serves 4

3 boneless, skinless, chicken breast halves (6 to 8 ounces each)
coarse salt and ground pepper
2 tablespoons vegetable oil
2 garlic cloves, minced
1/4 cup all-purpose flour
1 teaspoon ground cumin
1 to 2 tablespoons minced canned chipotles in adobo
1 can (14.5 ounces) low-sodium chicken broth
1/2 cup water
8 corn tortillas (6-inch), warmed
1/2 cup grated Monterey Jack cheese (2 ounces)

In a large skillet, bring 1 inch water to a boil.  Add chicken and season with salt; cover and reduce heat to medium-low.  Simmer 5 minutes; remove skillet from heat.  Let chicken steam, covered, until cooked through, 12 to 14 minutes.  Transfer chicken to a medium bowl; when cool enough to handle, shred with two forks.

While chicken is cooking, in a medium saucepan, heat oil over medium heat.  Add garlic, cook, stirring, until fragrant, about 1 minute.  Add flour, cumin, and chipotles to taste; cook, whisking, 1 minute.  Whisk in broth and the water; bring to a boil.  Reduce to a simmer, and cook, whisking occasionally, until sauce has thickened slightly, 5 to 8 minutes; season with salt and pepper.  Transfer 1 cup sauce to bowl with chicken; toss to combine.

Preheat oven to 400 degrees.  Spread 1/4 cup of remaining sauce evenly in an 8-inch square baking dish.  Fill each tortilla with chicken mixture, dividing evenly; roll up tightly, and arrange, seam side down, in baking dish.  Cover with remaining sauce, and top with cheese.  Bake until cheese is melted and sauce is bubbling, 15 to 20 minutes.  Let cool 5 minutes before serving.

Taylor's Notes:
To warm the tortillas, stack them and wrap them in damp paper towels and microwave for 30 to 60 seconds until soft.  This really helps them to not crack and tear when you're filling and rolling them up.  


I get that this is a light recipe and I probably shouldn't add more sauce, but I think I'll make just a tad bit more on the next go around.  More sauce, less cheese... if I must make a sacrifice.  And, speaking of cheese, I used pepper jack for a little more spice.  And, for the same reason, I added 3 or 4 chipotle chilies.  


I had this for leftovers a couple times and even froze one serving.  It heats up really well and anyone who knows me knows how I feel about leftovers, so eating this four different times really says a lot!


Enjoy!  

... Mini Mocha Cheesecakes

Martha Stewart (or, more likely, her awesome team) strikes again with another great recipe from her terrific light cookbook.  Call me crazy, but Mini Mocha Cheesecakes seemed like the perfect addition to our wine club.  Chocolate, wine, great girlfriends... 


... and pureed cottage cheese?  I know, it's weird, but when it comes out looking like this, you'll want to give it a try, too.


Mini Mocha Cheesecakes
makes 9

2 cups nonfat cottage cheese
2 large eggs
1 1/2 cups confectioners' sugar
1/3 cup unsweetened cocoa powder
1 tablespoon plus 1 1/2 teaspoons all-purpose flour
1 1/2 teaspoons instant espresso powder (not instant coffee)
1 1/2 teaspoons pure vanilla extract
9 chocolate wafer cookies, such as Famous
whipped cream, for serving (optional)

Preheat oven to 275 degrees.  Line 9 cups of a standard muffing tin with paper liners.  In a food processor, combine cottage cheese, eggs, confectioners' sugar, cocoa powder, flour, espresso powder, and vanilla.  Puree until smooth, about 4 minutes, scraping down sides as needed.

Divide mixture among prepared cups, filling each one just below rim, and place 1 cookie on top of each.  Bake until fillings are set and cookies soften, 25 to 30 minutes.  Transfer to a wire rack and let cool completely in pan, then refrigerate (in pan) at least 1 1/2 hours (or up to 3 days, covered).

To serve, invert cheesecakes onto plates and peel off liners.  Top each with a dollop of whipped cream, if desired.

Taylor's Notes:
I was a little leery of this one - pureed cottage cheese? - but after seeing the picture in the cookbook, I had to try it.  I knew my Cellar Dweller girls would be totally honest and, unless I'm wrong about them, they all agreed that it was a keeper of a recipe... especially at 196 calories.  Did you hear that?  196 calories for chocolate cheesecake!


I pureed my cottage cheese in my food processor and it worked great.  I must remember, however, to add a large processor to my wish list.  My mini guy does the trick, but takes a few may rounds to blend all the ingredients.  


As you can probably tell by the picture, I wasn't able to find chocolate wafer cookies, but did find wafer sugar cookies and those worked just as well - the slight crunch was a great change of texture.


Enjoy!

... Salmon in Parchment with Green Beans and Lemon Zest

It was 79 degrees in Kansas City today.  Today is March 12.  79 degrees... on March 12.  In what universe does that happen!?!  My favorite universe, that's what.  Also a universe that makes a girl realize just how close we are to swimsuit season.  


So, what better way to prepare than fresh fish and veggies steamed in parchment in the oven?  This is arguably the quickest recipe I've come across in my new favorite cookbook.


If you're like me and this is your first time cooking in parchment, you can find three different ways to use it.  This is the 'twist', but all seem super easy and make this method of cooking a no-brainer.


Now if this doesn't look like a superb Spring dinner, I'm not sure what would.


Salmon in Parchment with Green Beans and Lemon Zest
serves 4

4 skinless salmon fillets (about 6 ounces each)
3/4 pound green beans, trimmed
12 wide strips (1 to 2 inches) lemon zest (from 2 lemons)
1 tablespoon plus 1 teaspoon capers, rinsed and drained
coarse salt and ground pepper
1 tablespoon plus 1 teaspoon olive oil

Preheat oven to 400 degrees.  Place salmon fillets in center of four 16-inch-long pieces of parchment.  Top with green beans, lemon zest, and capers.  Season with salt and pepper and drizzle each with 1 tablespoon oil. Fold parchment into a "twist" or "envelope" shape.  *"Twist" is folding the parchment over the food like a letter and then twisting each end tightly to hold; "Envelope" is bringing the wide ends of the parchment together then folding down three times on top of food.  Fold the ends under the food packet to hold.


Place packets on a rimmed baking sheet and transfer to oven.  Cook until packets are puffed up (salmon will be opaque throughout), 12 to 15 minutes.  Serve immediately.

Taylor's Notes:
This recipe is as easy as it sounds.  It's inexpensive, too... and delicious... and healthy... and quick... and what more could you want?!  I bought salmon fillets with the skin on and put them in the packet like that.  It's much easier to peel off once the salmon is cooked and, to my knowledge, it's not a bad thing to cook with the skin on.  Right?  C'mon, they do it in restaurants all the time... 


Enjoy!